


Laser head dimming method for laser cutting machine
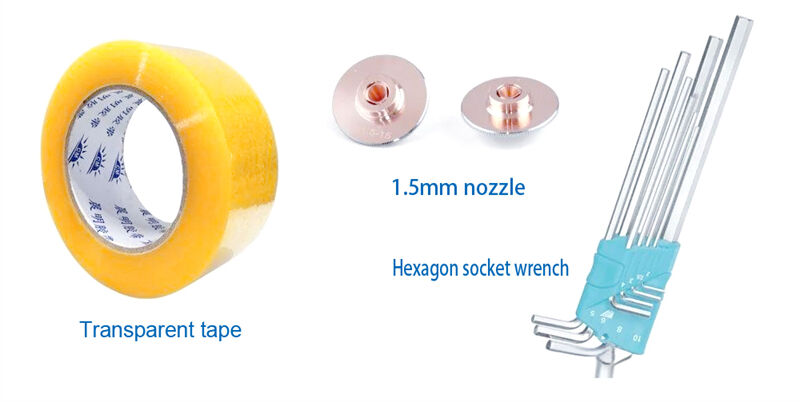
The coaxiality between the nozzle outlet hole and the laser beam is crucial to the cutting quality. Slight coaxiality deviation may lead to inconsistent cutting surface effects, while severe deviation may cause the laser to directly hit the nozzle, causing the nozzle to overheat or even burn, which is usually called the laser head dimming problem. In order to solve this problem, we need to do a series of preparations, among which the choice of tools is crucial.
Dimming process
When solving the laser head dimming problem, we need to follow a set of rigorous dimming steps. These steps are not only related to the safety of the equipment, but also directly affect the quality and efficiency of cutting. Through these steps, we can ensure that the coaxiality between the nozzle outlet hole and the laser beam reaches the ideal state, thereby avoiding unnecessary damage and improving the overall work effect.
1. After entering the dotting parameter setting interface, adjust the dimming power to a range of 5 to 10 watts.
2. Replace with a small-caliber nozzle, which can be applied to both single-layer and double-layer.
3. Take a piece of transparent tape and stick it flat on the plane of the nozzle, and pay attention to the direction of the tape. During subsequent observation and comparison, ensure that the direction of the tape remains consistent.
4. Press the "Shoot" button on the remote control and release it quickly;
5. Remove the tape and carefully observe the mark on the tape, taking care to maintain the original direction of the tape. In the mark, you will see a circle approximately the size of the aperture. Next, carefully examine whether the light spot is precisely located in the center of the nozzle circle.
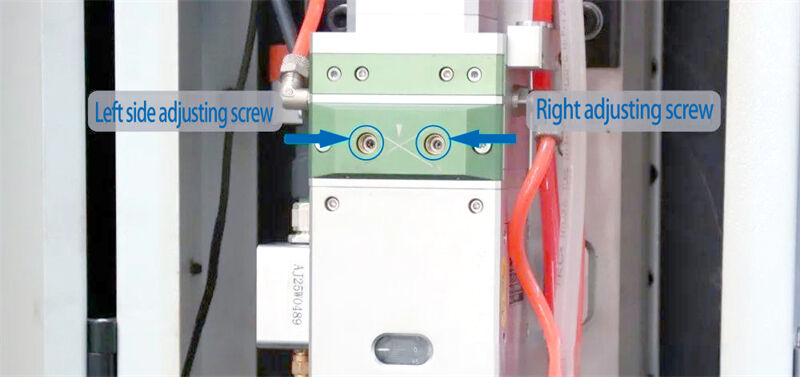
6. If you find that the light spot is not precisely aligned with the center of the nozzle circle, you can use an Allen wrench to make detailed adjustments by rotating the screws on the left and right sides until the light spot can be smoothly moved to the center of the circle. Please note that this process may require repeated testing and fine-tuning to ensure the accuracy of the spot position.
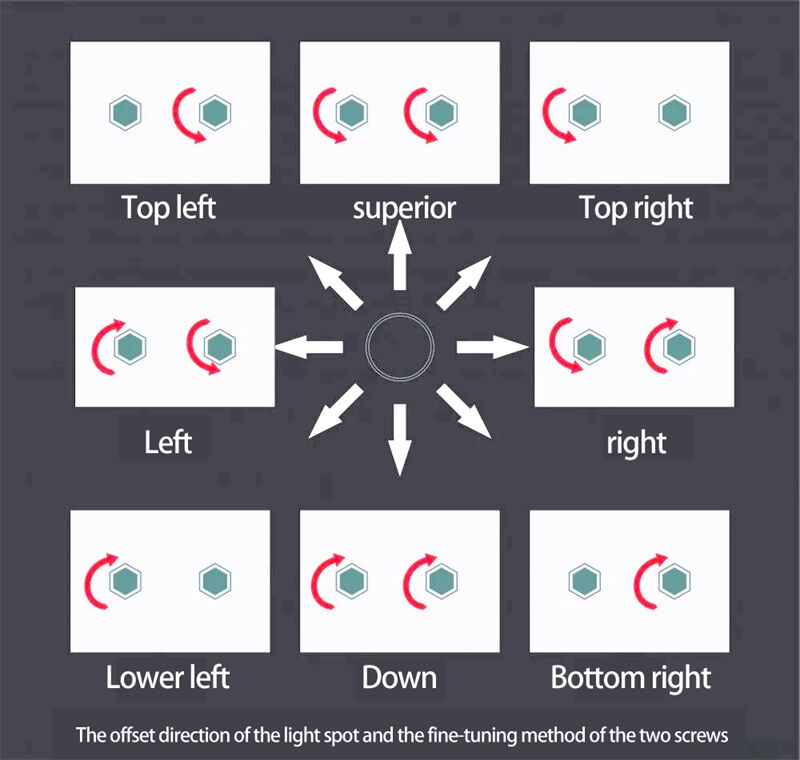
7. If the light spot position deviates from the center of the circle, you can use an Allen wrench to fine-tune it. Specifically:
a. When the light spot is in the upper left corner of the circle, the right screw should be rotated counterclockwise to adjust the tightness.
b. If the light spot is in the upper right corner, the left screw needs to be rotated counterclockwise.
c. When the light spot is just above the circle, turn both screws counterclockwise to adjust the balance.
d. If the light spot is on the left, turn the left screw clockwise (tighten) and the right screw counterclockwise.
e. When the light spot is on the right, turn the left screw counterclockwise (loosen) and the right screw clockwise (tighten).
f. If the light spot is just below, turn both screws clockwise to tighten.
g. When the light spot is in the lower left corner, turn the left screw clockwise to tighten.
h. If the light spot is in the lower right corner, turn the right screw clockwise.
Please follow the above steps and adjust step by step until the light spot is accurately aligned with the center of the circle. Note that repeated tests may be required during the adjustment process to ensure accuracy.
JUGAO CNC MACHINE's main products include laser cutting machines, CNC hydraulic bending machines, laser welding machines, shearing machines and pipe bending machines, etc., which are used in sheet metal processing, chassis cabinets, lighting, mobile phones, 3C, kitchenware, bathroom, auto parts machining and hardware industries.Welcome to consult online to learn more about the machine information.

