


Maximizing Bending Efficiency with ESA S630 Programming
In the realm of metal bending, ESA S630 Programming is a critical driver of
productivity. This article details how its advanced capabilities streamline
bending operations, from precision sequencing to reduced cycle times. Designed
for both CNC veterans and newcomers, this guide delivers the key insights needed
to harness the ESA S630 for peak operational efficiency and throughput.
Comprehensive List of Bending Programs
ESA S630 Programming provides a comprehensive suite of specialized programs designed to optimize bending operations for a wide variety of applications. Below is an overview of the available program types and their respective uses:
1. Program List Management:
Navigate to the program list through the dedicated menu interface. This centralized directory offers a structured overview of all stored programs, with the ability to view detailed program data directly by positioning the cursor on any entry.
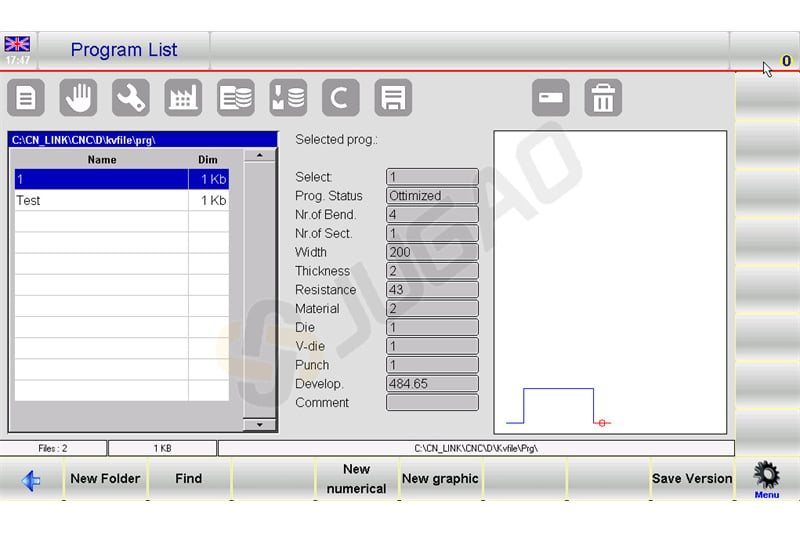
Use the scroll bar to navigate through the list efficiently.
2. Program Creation and Customization:
New Folder: Organize your programs by creating new folders for easy management.
New Numerical and New Graphic Programs: Set up new programs based on numerical data or visual graphics, enhancing precision and visualization in complex operations.
Copy and Rename Functions: Quickly duplicate programs with new names, allowing for easy modifications and adaptations to specific bending requirements.
Program Preview and Editing:
Enable program previews to visualize graphic programs. This feature can be toggled off if a simplified view is preferred. Perform edits such as renaming or copying directly from the menu, streamlining the management process.
3. Data Backup and Transfer:
Save programs to a USB device to transfer across different machines or for backup purposes. This feature ensures your bending operations are consistently supported regardless of location.
Save or delete multiple programs simultaneously using the dedicated options, ensuring efficient data management.
To change the work unit using ESA S630 Programming, follow these steps:
Press the button to access the Program List.
Navigate to the Menu by pressing the corresponding button.
Select option 5 to Change Work Drive.
Use your finger to choose a work drive from the displayed list.
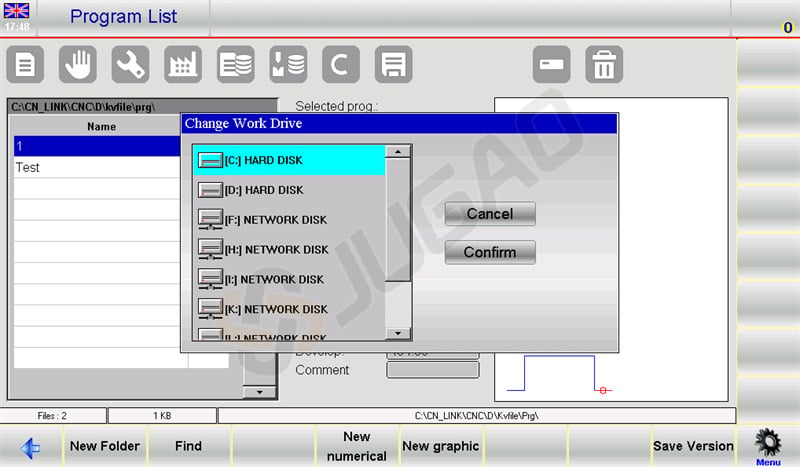
This sequence ensures that you utilize ESA S630 Programming efficiently, enhancing the setup process and maintaining optimal machine performance.
Numeric vs. Graphic Program Input
Entering a numeric program
To enter a new numeric program press [New Programm] from the Editor page of a numerical program and select [New numerical]:
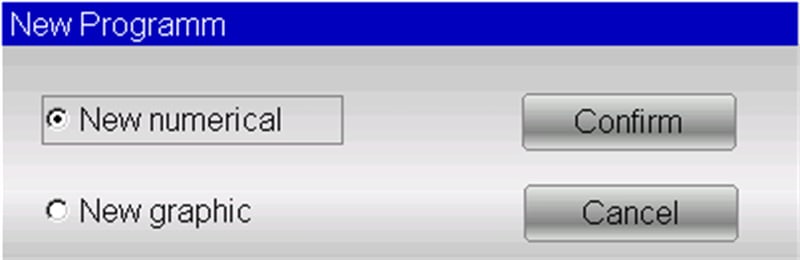
Or it can be create from the program list pressing and [New numerical] .
ESA S630 Programming significantly optimizes bending operations by streamlining key tasks. Here’s a concise guide:
1. Setting the piece data
A window will open for entering the program data:
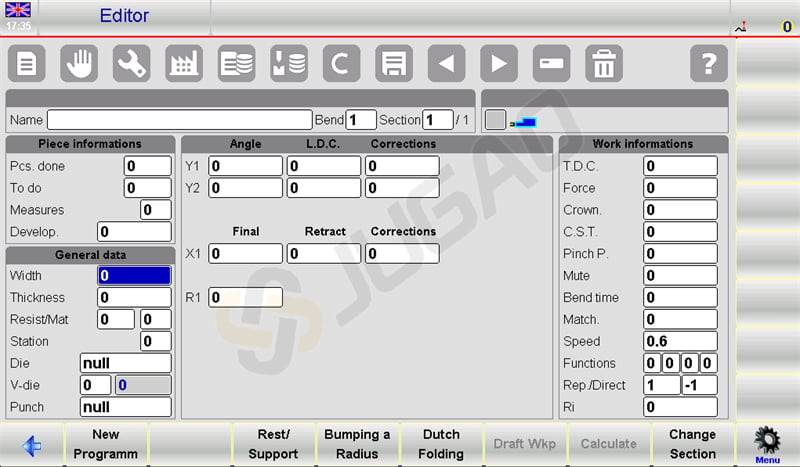
Metal Sheet Width: Tap the field, input the width, and select [Ok].
Metal Sheet Thickness: Enter the thickness similarly.
Resistance Values:
Aluminium: 0-30
Iron: 31-50
Stainless Steel: >50
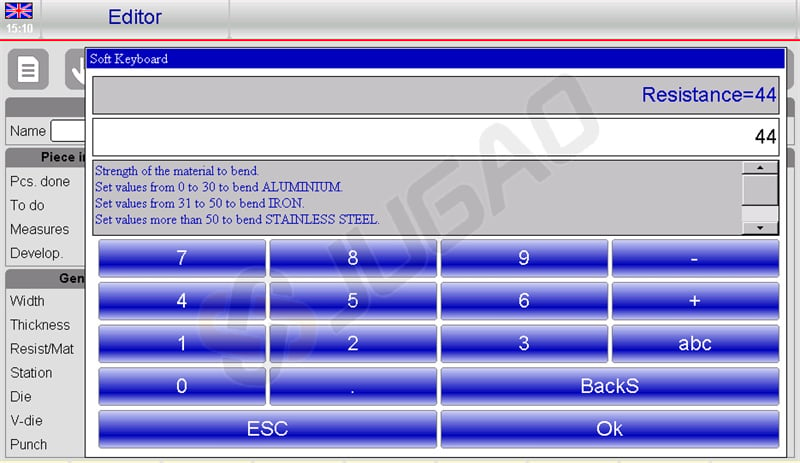
Automatic Material Calculation: The system calculates material based on resistance, reducing manual input.
Work Station Setup: Enter the station number if applicable; otherwise, leave it as 0.
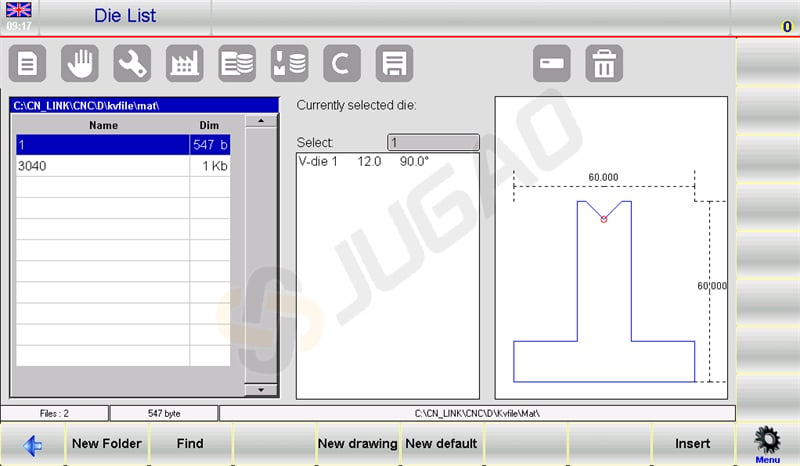
Die and V-Die Selection:
Select a die from the list by touching the field, scrolling, and pressing [Insert].
Choose the appropriate V-die if there are multiples; if only one, enter 1.
Punch Selection: Choose the punch similarly by accessing the list, scrolling, and pressing [Insert].
2. Setting and Adjusting Bends
Input the desired bend angle in the Y1 Angle field.
Set the bend length in the Field Final X1.
Data auto-calculates but is customizable.
3. Managing Work Data
Access 7>>Work Information to review T.D.C, Mute, and Pinch Point data.
Exit by selecting [Ok].
4. Bend Operations
Copy Bend: Navigate to the target bend, open the menu, and select5>> Copy step.
Insert Bend: Position after the entry point, choose4>> insert step.
Enter Copied Bend: Place it before the target bend following similar steps.
5. Radius and Specialized Bends
Use [Bumping a Radius] to enter rolling angles and radii, confirming with [Confirm].
Adjust Dutch folding and coning by modifying L.D.C. and lower dead points in Y1 and Y2.
6. Handling Specialized Applications
Conical Bends: Enter conical angles via the [Conic] function.
Out-of V-die Bends: Input end values in L.D.C Y1/Y2 and ensure higher Pinch and Mute points.
7. Program Management
Save programs with 2>> Save as …. for new variations of existing programs.
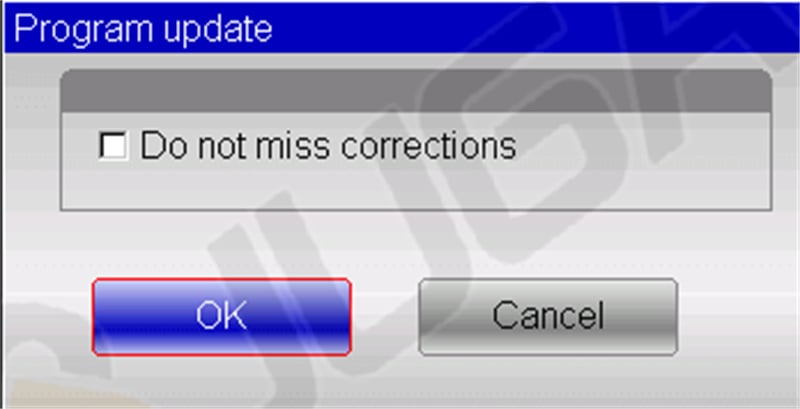
When a tool changes in your ESA S630 Programming project, follow these steps to update the program:
Download: Access and download the program from your list.
Open Editor: Go to the Editor page and open the menu.
Update Program: Choose 3>> Program update to open the update window.
Recalculate: Click [Ok] to recalculate all data, ensuring corrections are applied.
Save: Save the updated program if needed.
These efficient practices using ESA S630 Programming can enhance precision and reduce errors, optimizing your bending operations.
Entering a graphic program (Optional in the S630 model)
To enter a new graphic program press [New Programm] from the Editor page of a numerical program and select [New graphic]:
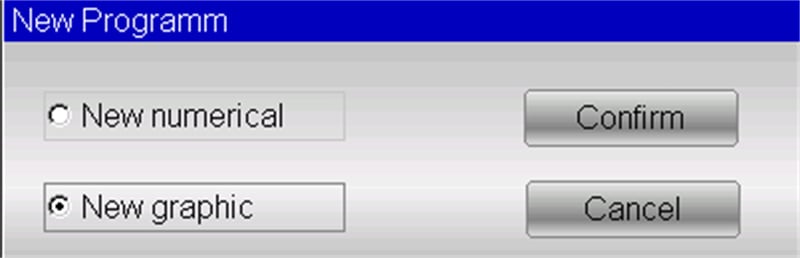
Or it can be create from the program list pressing and [New graphic] .
1. Setting of the general data
When using ESA S630 Programming, inputting the correct general data is essential for accessing the drawing function. Follow these steps:
Metal Sheet Details:
Enter the width and thickness, selecting each field and confirming with [Ok].
Input material resistance; the system calculates properties based on this.
Tool and Station Setup:
Enter the workstation number, or leave as 0 if single.
Select and insert the die from the list.
Indicate the V-die (enter 1 if only one).
Set Die and Punch Orientation (0 = standard, 1 = rotated 180°).
Choose and insert the punch from the list.
2. Drawing window
The drawing window page will be opened.
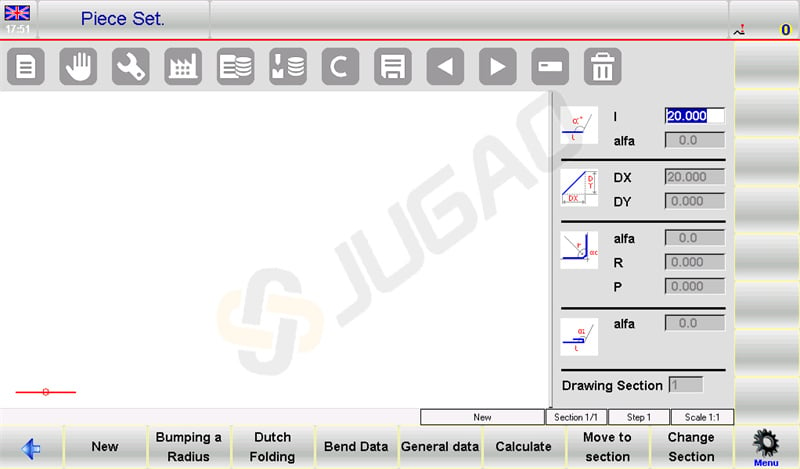
Left: Main drawing window.
Right: Four data input windows for:
Polar Drawing Data
Cartesian Drawing Data (usually not used)
Radius Bends
Dutch Folding Bends (Hemming)
3. Input Process:
Start in the Piece Set page where the first segment defaults to 20.0 mm.
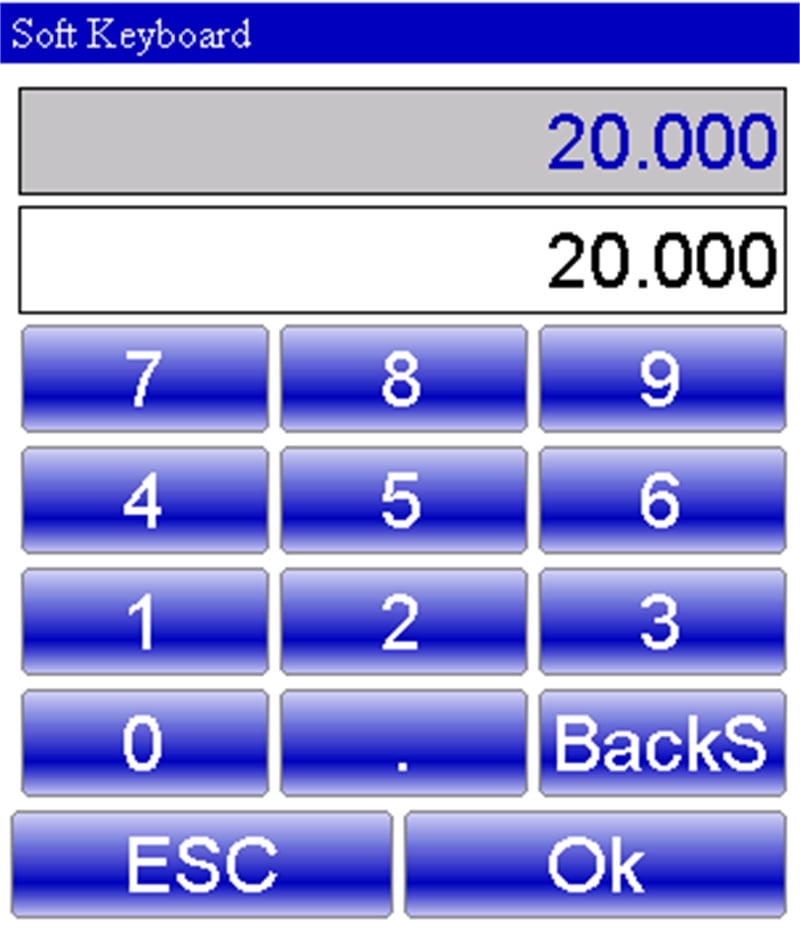
Modify this by selecting the “l” field to open the “Soft Keyboard.”
After confirming changes, proceed to adjust the “alpha” polar drawing using the angles “Soft Keyboard.”
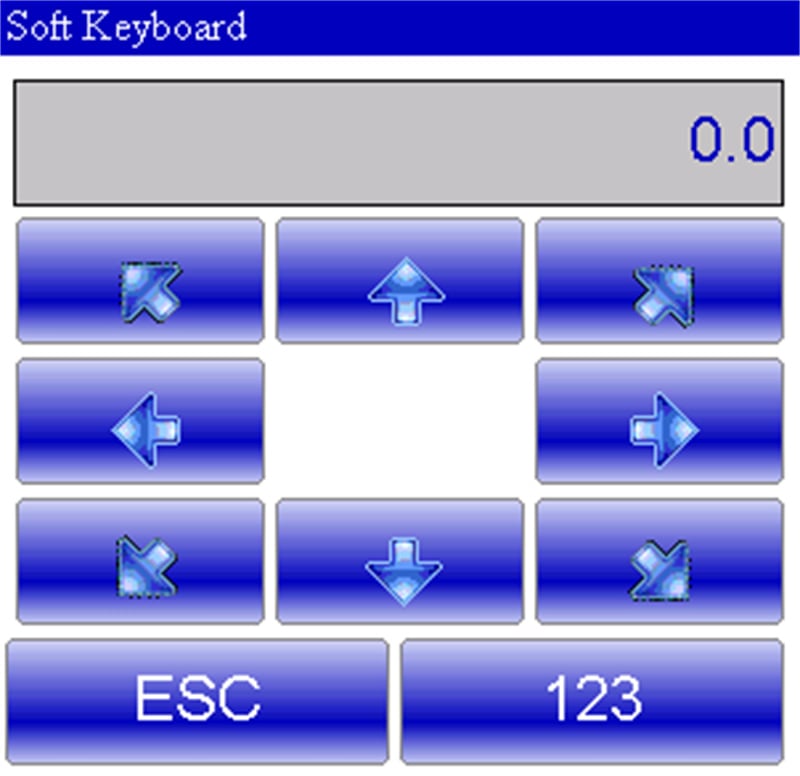

Set predefined angles or input custom ones, then move to the next length field to continue the design.
4. Bend Sequencing
Access the AUTOMATIC graphic page.
Select0>> Bending sequence to manage and navigate different bends efficiently.
5. Change Background Color
Open the menu from the AUTOMATIC page.
Select 1>> Change color for visual customization.
6. 3D Viewer (Optional)
Access the 3D view from the AUTOMATIC page. select the item 3>> 3D Viewer.
Switch between 3D and 2D views as needed.
7. Realize the drawing of a piece
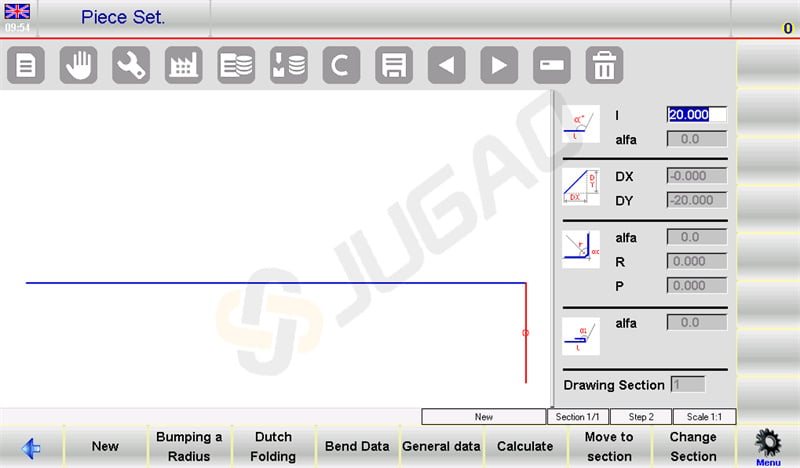
Let’s suppose we have to draw the piece illustrated in the figure below:
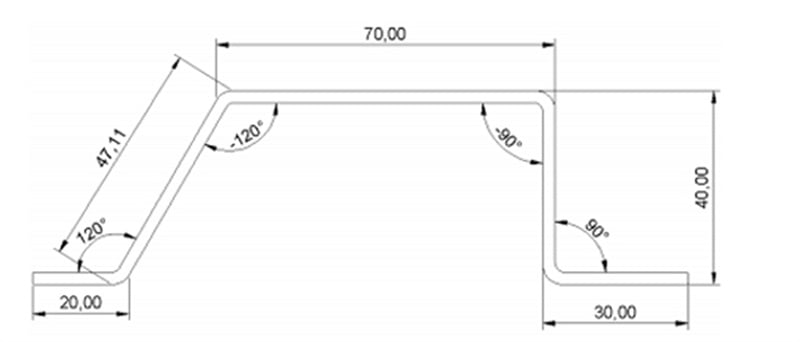
Setup: In the drawing window, enter the initial segment length (e.g., 20.0) in the “l” field and press [Ok].
Angle and Length Input:
Enter the first angle (120.0°) in the “alfa” field and confirm with [Ok].
Proceed with automatic drawing for the next length. Ensure it is highlighted.
Input the second length (47.11) in the “l” field and confirm.
Sequential Entries:
Enter the next angle (-120.0°) in the “alfa” field and press [Ok].
Continue with the third length (70.0) input in the “l” field.
Set the third angle (-90.0°) using ESA S630 Programming and confirm entry.
Completion:
Input the fourth length (40.0), followed by its angle (90.0°) using the “alfa” field.
Add the fifth and final length (30.0) to complete the drawing process.
8. Realize a radius bend
In order to realize a radius bend it is necessary to bear in mind that as per the convention, there must be a length of metal sheet before and after the radius.
Let’s suppose we have to draw the piece illustrated in the figure below:
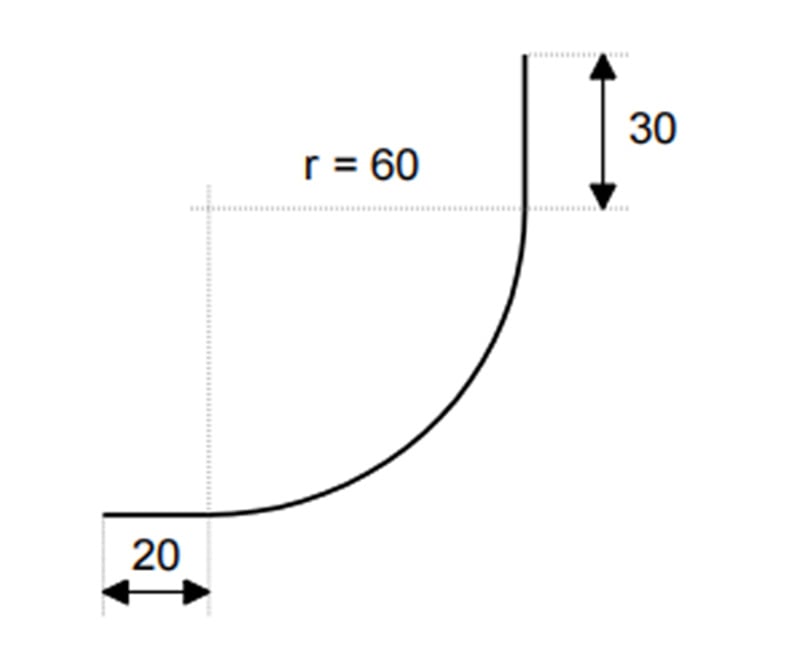
To efficiently create a radius bend using ESA S630 Programming, follow these concise steps:
Initialize Length: Enter the initial piece length (e.g., 20.0) in field “I” and press [Ok].
Set Radius Parameters:
Select [Bumping a Radius] to open the radius settings.
Enter the rolling angle (e.g., 90.0°) in “alfa” and press [Ok].
Input the rolling radius (e.g., 60.0) in “R” and confirm.
Define Pitch: Specify the rolling pitch in field “P” and press [Ok]. The system will proceed automatically.
Finalize Length: Input the final piece length (e.g., 30.0) in field “I” and confirm with [Ok].
9. execute a Dutch Folding (hemming)
Let’s suppose we have to draw the piece illustrated in the figure:
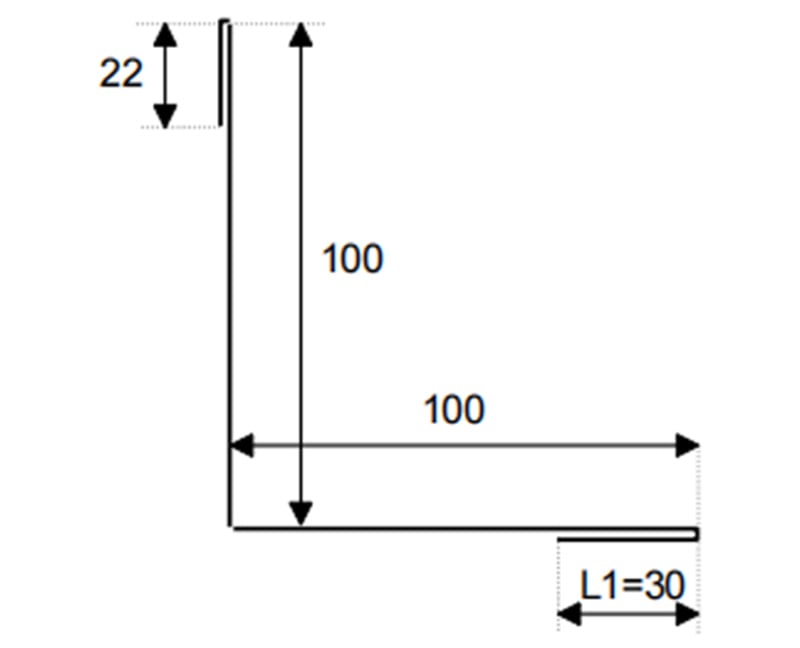
Initial Entry: Enter the hemmed side length (30.0) in the “l” field.
Dutch Folding:
Press [Ok] and select [Dutch Folding].
Set the folding angle (45.0°) in the “alpha” field.
Automated Drawing: Confirm with [Ok] to automatically draw and highlight the next length.
Additional Lengths & Angles: Input subsequent lengths (100.0) in “I” and set angles (-90.0°) in “alfa”.
Final Steps: Enter the last side length (22.0) in “I” and complete with [Ok].
Bending Sequence Calculations: Automatic vs. Manual
Selecting the appropriate method for bending sequence calculation on CNC press brakes can significantly affect efficiency. Here’s a concise comparison of automatic and manual methods, with insights into how ESA S630 Programming optimizes the process.
Automatic Calculation
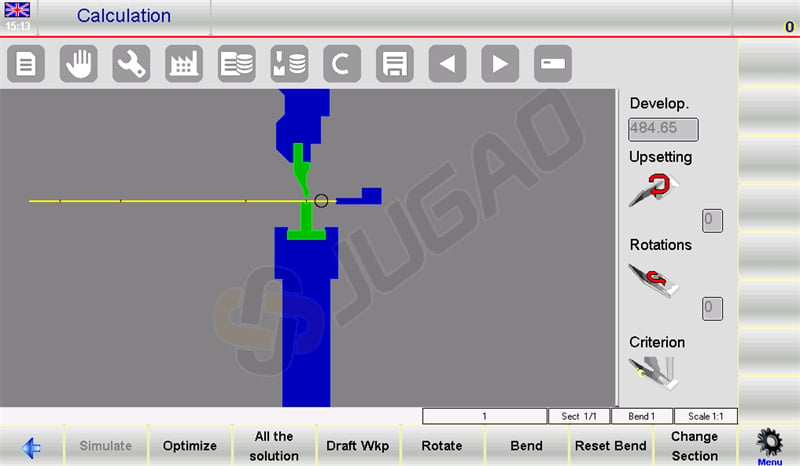
Process: Initiate via the drawing page by pressing [Calculate]. A simulation displays the setup for bending.
Optimization: ESA S630 Programming automatically determines the optimal sequence by pressing [Optimize].
Benefits:
Efficiency: Reduces errors and cycle time through optimal sequencing.
Safety: Prioritizes operator safety by choosing sequences that keep more material in safe handling zones.
Manual Calculation
Process: Operators manually force sequences from the drawing page.
Flexibility: Allows full or partial control over the sequence, suitable for complex bends.
Benefits:
Control: Offers greater direct influence over the process for bespoke operations.
Problem Solving: Enables precise adjustments when dealing with challenging bends.
When to Use Each Method
Automatic: Best for consistent, straightforward tasks where efficiency is key.
Manual: Ideal for complex or custom tasks requiring detailed control and problem-solving.
The ESA S630 Programming excels in both methods, offering enhanced automatic optimization compared to older models like the S540, thus improving bending efficiency and adaptability.
Efficient Bending of Boxes
To accurately bend a box using ESA S630 Programming, follow these streamlined steps:
1. Bending Section Setup:
Create Two Programs: Use ESA S630 Programming to create separate programs for horizontal and vertical bends. Execute these sequentially, starting with the section using the smallest sheet metal width.
2. Section Management:
Add Sections: Press [Change Section] to add a new section.
Delete Sections: Navigate to the section, open the menu, and choose 6>> Delete section to remove it and revert to bend 1 of section 1.
3. Addressing Common Challenges:
Misalignment: Use ESA S630’s simulation feature to verify bend sequences and correct alignment.
Cycle Time: Optimize operation order within ESA S630 Programming to minimize repositioning and reduce cycle times.
With these concise steps, ESA S630 Programming enables precise and efficient box bending.
Conclusion
In summary, proficiency in ESA S630 Programming delivers substantial gains in bending efficiency through ensured precision and repeatable outcomes. Key success factors include thorough preparation of the working environment, precise machine configuration and calibration, and strict adherence to manufacturer specifications for tooling and operational procedures. Implementing these disciplined practices enables production lines to operate at higher throughput with minimized material waste, leading to measurable improvements in overall productivity.
For specialized technical support or customized guidance, please contact the JUGAO team. We are ready to address your specific needs and provide additional resources to further optimize your bending processes. We also encourage you to explore our full range of technical documentation to continue enhancing your press brake performance and operational excellence.

