


Kako brzo riješiti problem promjene alata na stroju za savijanje cijevi?
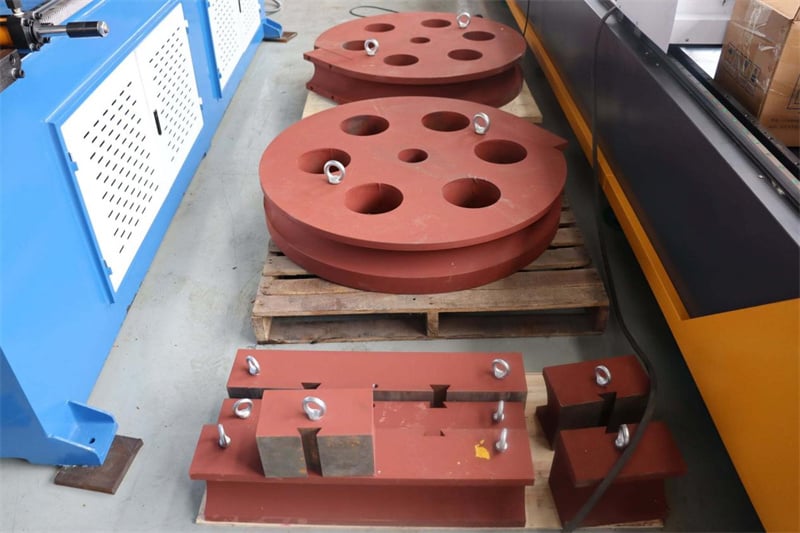
U savijanju cijevi, "promjena alata" obično se odnosi na zamjenu komponenti kalupara kao što su savijanje, začepljenje, anti-brijegovi i mandrels, umjesto tradicionalnih alatki za rezanje. Problemi poput ugaonskih odstupanja, bore i ogrebotina koji se javljaju nakon zamjene kalupara među su najčešćim problemima koji se susreću u radovima na mjestu. Sposobnost sistematskih i brzih rješenja može značajno skratiti vrijeme ispravljanja grešaka i osigurati kontinuitet proizvodnje.
U slučaju da se primjenjuje metoda iz članka 4. stavka 1. točke (a) ili (b) ovog članka, to se može upotrebljavati za utvrđivanje primjene.
Korak 1: Otkrijte uzrok problema
Anormalije nakon promjene alata obično spadaju u tri kategorije:
**Nepreciznost ugla:** Stvarni kut za savijanje značajno odstječe od postavljene vrijednosti ili je povratni skok abnormalan.
**Nepobjedi na površini:** Zbunjene površine, gužve na unutarnjoj strani, pucanje na vanjskoj strani, ogrebotine na površini.
* Geometrijska odstupanja: * Okretanje cijevi, eliptični presjek, netačna dužina zalivanja.
Korak 2: rješavanje osnovnih uzroka po pojedinačnim stvarima
1. Sljedeći članak Nepoštovanje zahtjeva za odobrenje
Najprije je uzrok problema nakon promjene alata nesukladnost između trake i cevi.
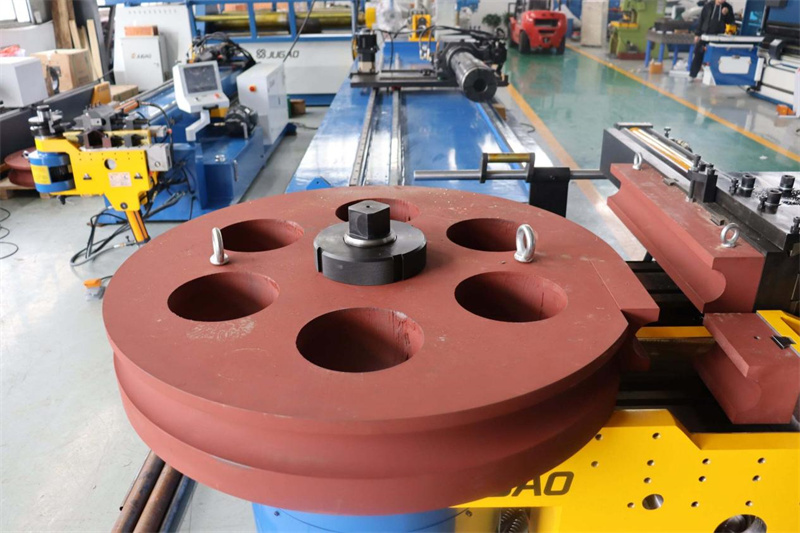
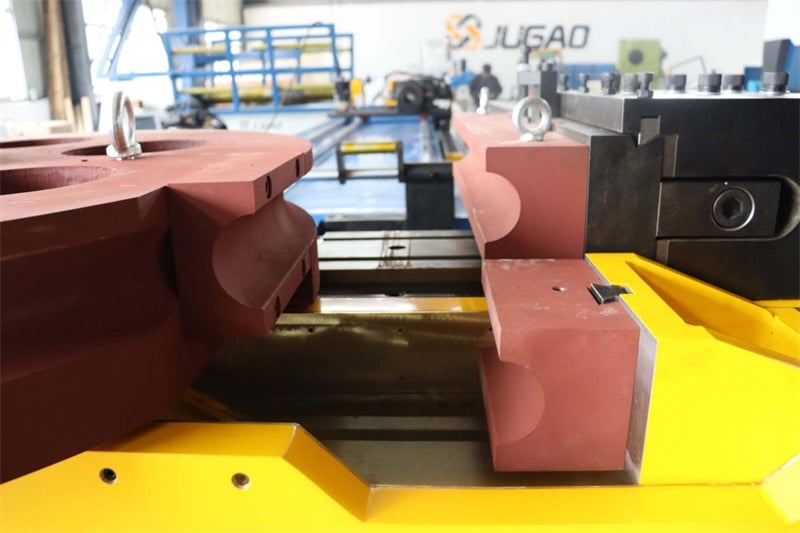
**Zunanji prečnik cijevi ne odgovara žlijezdu:** Specifikacije cijevi moraju savršeno odgovarati vanjskom prečniku cijevi. Ako se koristi prevelika ploča, pojavit će se bore, dok će se ona s manjom površinom ravniti ili čak zaglaviti.
**Neispravno odabir polumjera savijanja (R kut):** Polumjer savijanja matice određuje kut savijanja cijevi i mora se strogo odabrati u skladu s zahtjevima crteža.
**Neadekvatno ugradnja ili otpuštanje:** Ako se čvrstinski ili anti-zgubični čvor ne ugrađuje ispravno ili ako su čvorovi za pričvršćivanje los, čvor će se pomaknuti tijekom savijanja.
Brzo rješenje:
Prije nego što zamijenite crtež, provjerite da li se specifikacije crteža poklapaju s vanjskim prečnikom cijevi, debljinom zida i polumjerom savijanja.
U slučaju da se ne primjenjuje primjena ovog standarda, u slučaju da se ne primjenjuje, mora se provjeriti da je to u skladu s člankom 6. stavkom 2.
U slučaju da se ne provede ispitivanje, ispitni materijal se može upotrijebiti za ispitivanje.
2. - Što? Neispravno poravnanje i položaj mandrila
Ravnoteža matice je ključna za osiguravanje točnosti savijanja cijevi. Čak i manje odstupanja mogu uzrokovati zakrivljenje ili neujednačeno savijanje cijevi.
Neispravnost skretnice i mandrila: mandrila, anti-brijeda i skretnica nisu na istoj središnjoj liniji.
Neadekvatno proširenje mandrila: Prekomjerno proširenje će ogrebati unutarnji zid cijevi; nedovoljno proširenje neće učinkovito spriječiti bore.
Brza rješenja:
Ako je to moguće, ispitati se na temelju podataka iz članka 4. stavka 2.
U skladu s člankom 3. točkom (a) ovog članka, za sve vrste vozila, u skladu s člankom 3. točkom (a) ovog članka, za koje se primjenjuje točka (b) ovog članka, za vozila s brzinom od 300 mm do 300 mm, za vozila s brzinom od 300 mm do 300 mm, za vozila s brzin
Provjerite je li prednja ivica antirupne matrice poravnan s linijom rezanja savijanja matrice; razlika treba biti dovoljna da se cijev uklopi bez zamašljanja.
3. Slijedi sljedeće: Neobična snaga za pričvršćivanje i mazanje:
U slučaju da se ne primjenjuje, to se može učiniti na temelju sljedećih kriterija: Nehrđajući čelik zahtijeva mnogo veću snagu za čvrstinu od aluminija. Ako se nakon promjene alata koriste prethodni parametri tlaka, vrlo je lako da cev klizi ili se udublja.
Neodgovarajuća sila za začepljenje: cijev se klizi tijekom savijanja, što uzrokuje gubitak kontrole ugla.
Prekomjerna sila za čvrstinu: na površini cijevi pojavljuju se udubljenja.
Neadekvatno podmazivanje: Suvo trenje između cijevi i matice uzrokuje ogrebotine i buku.
Brza rješenja:
U slučaju da se cijev ne klizi, potrebno je da se cijev ne klizi.
U slučaju da se ne primijenjuje poseban ulje za savijanje cijevi, u slučaju da se ne primijenjuje posebno ulje za savijanje cijevi, u slučaju da se ne primijenjuje posebno ulje za savijanje cijevi, u slučaju da se ne primijenjuje posebno ulje za savijanje cijevi, u slučaju da se ne primijenjuje posebno
Provjerite čišću površine cijevi, uklanjajući mrlje i mrlje od ulja.
4. - Što? Neaktualizirani parametri sustava kontrole
Nakon promjene matice na nekim CNC mašinama za savijanje cijevi, prethodno pohranjeni parametri kao što su povlačenje mandrila, brzina savijanja i pritisak više nisu primjenjivi. Ako se ne unesu ispravni parametri, oprema može nastaviti koristiti staru konfiguraciju, što dovodi do odstupanja u savijanju.
Brzo rješenje:
Prema novim specifikacijama za kalup, ponovo unesite parametre kao što su položaj povlačenja mandrila, brzina savijanja i pritisak.
Shrani uspješne parametre kao recept za povlačenje jednim klikom tijekom sljedeće promjene alata, izbjegavajući ponavljanje postavki.
- Pet. Smanjenje vrijednosti za sve druge komponente
U slučaju automatskog savijanja cijevi opremljenog ATC-om, neuspjehi nakon promjene alata često su povezani s samim uređajem za mijenjanje alata. U slučaju da se ne može primijeniti sustav za upravljanje radnim prostorom, potrebno je osigurati da se ne može koristiti sustav za upravljanje radnim prostorom.
Brzo rješenje:
Ako je to moguće, provjerite da li je tlak zraka dostigao standardni raspon od 6 kg ± 1 kg.
Provjerite stanje robotizirane ruke i potvrdite da je nosilac alata zaključan na mjestu.
Ako je potrebno, ponovno kalibrirati.
U slučaju da se ne provjeri, ispitna sila mora biti u skladu s člankom 6. stavkom 2.
U slučaju da se ne primjenjuje presjek, ispitna cijev se može upotrijebiti za ispitivanje.
U slučaju da je to moguće, mora se utvrditi da je to uobičajeno za upotrebu u proizvodima za proizvodnju.
Provjerite da li je na površini zakrivljene cijevi ima bore, ogrebotina i pukotina.
U slučaju da se testiranje provodi na temelju ispitivanja, ispitni materijal se mora upotrijebiti za ispitivanje.
U slučaju da se ne provede ispitivanje, ispitna sila treba biti u skladu s postupkom iz stavka 2.
Preventivni savjet
U slučaju da je proizvod u stanju da se koristi, mora se provjeriti da je proizvod u stanju da se koristi.
Standardizirati skladištenje kalupara: Čistite i nanesite ulje protiv hrđe na kalupare nakon upotrebe i skladištite ih odvojeno kako biste spriječili udar i koroziju.
Upisati uspješne parametre: Arhivirati parametre savijanja koji odgovaraju svakom materijalu, promjeru cijevi i debljini zida za izravno preuzimanje tijekom sljedeće promjene alata.
Ključ brzog rješavanja problema s izmjenom alata leži u kombinaciji sustavnog otklanjanja grešaka s standardiziranim postupcima. Od kompatibilnosti kalup, poravnanja instalacije, postavljanja parametara do provjere savijanja, svaki korak ima određene korake koje treba slijediti, što minimizira vrijeme za ispravljanje grešaka.

