


Guide to Safely Adjusting ESA S875 User Parameter Mask
If you're looking to fine-tune machine settings while keeping protected
factory data secure, understanding the ESA S875 User Parameters Mask is
essential. This interface allows operators to safely adjust changeable
parameters—including axis calibration corrections and selected configuration
settings—without requiring a password. As a result, it becomes possible to
compensate for mechanical wear, maintain accurate ram resetting heights, and
optimize performance, all while safeguarding core machine parameters. In this
guide, I will explain how to access the ESA S875 User Parameters Mask, how to
properly adjust axis calibration corrections, and how to manage other available
parameters in a safe and controlled manner.
Inroduction
The ESA S875 User Parameters Mask is a dedicated interface that enables end users to modify selected machine parameters without accessing protected factory settings. Unlike the main machine parameter area, the User Parameters Mask does not require a password. This design ensures that operators can safely adjust operational data while preventing unintended changes to core machine configurations.
The primary purpose of the User Parameters Mask is to provide controlled flexibility. Over time, mechanical components such as the ram, guides, or transmission systems may experience slight wear. These changes can affect resetting heights and axis positioning accuracy. Instead of modifying factory calibration data directly, the User Parameters Mask allows corrections to be applied as offsets, ensuring long-term precision and stability.To access the User Parameters Mask:
1. Open the Settings mask.
2. Press the Menu key.
3. Select User Parameters (4).
4. The ESA S875 User Parameters Mask window will open.
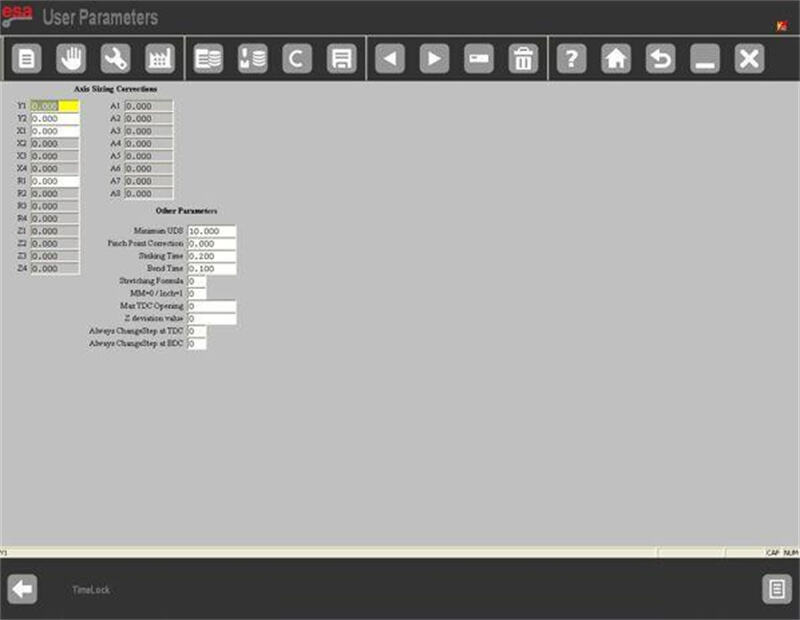
Once inside, only editable and safe parameters are displayed, ensuring secure parameter management.
How to Perform Axis Calibration Corrections
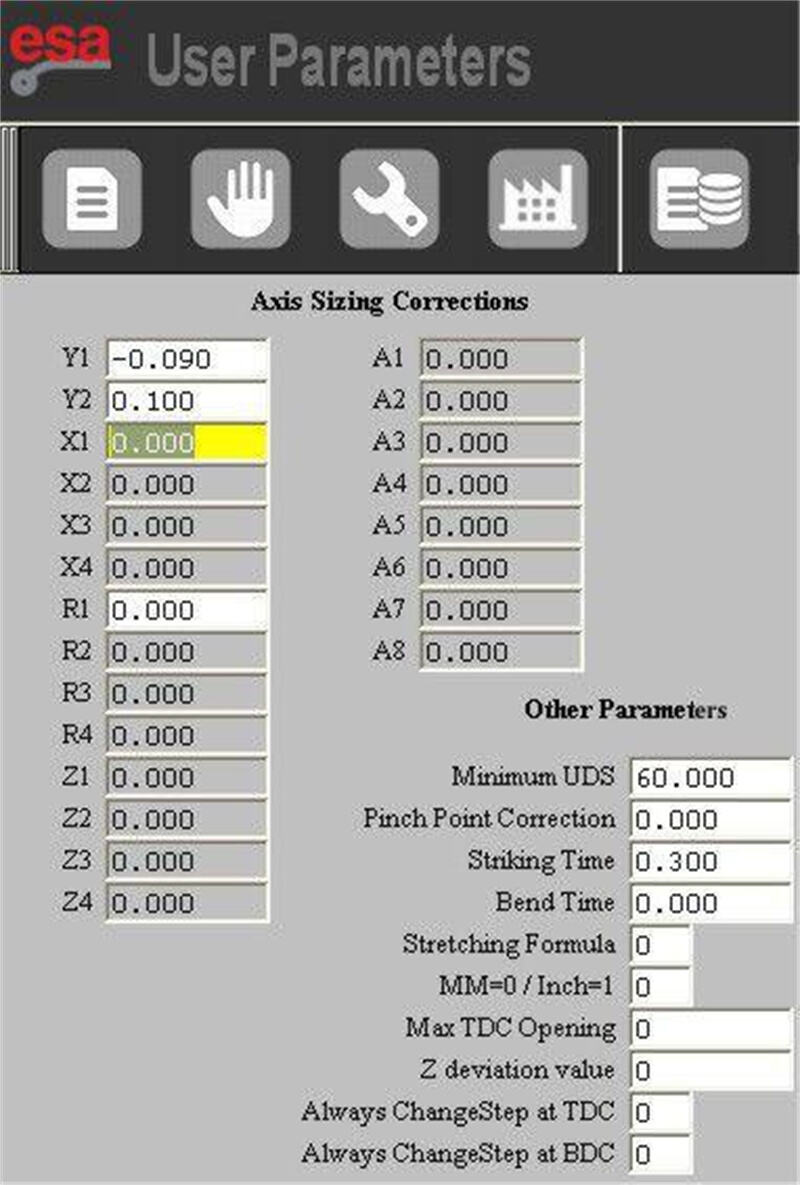
Inside the ESA S875 User Parameters Mask, one of the most critical areas is the section for corrections to axis calibration parameters. These fields allow adjustment of resetting heights compared to original factory values.
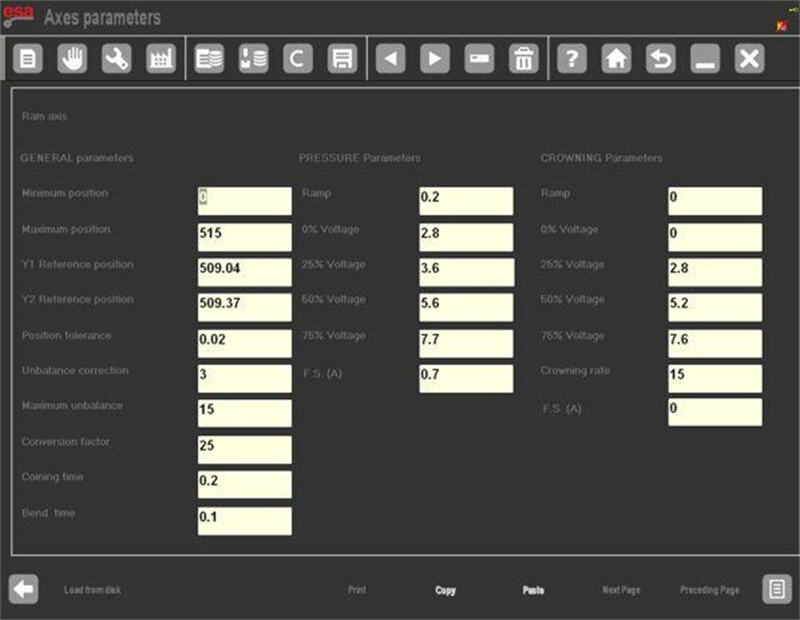
For example, assume the factory resetting heights are:
Y1 = 230.93 mm
Y2 = 230.09 mm
After long-term operation, measurement may indicate minor deviation. Suppose testing shows:
Y1 needs -0.09 mm correction
Y2 needs +0.10 mm correction
These correction values must be entered directly into the Y1 and Y2 fields inside the ESA S875 User Parameters Mask.
This adjustment compensates for mechanical variation without altering the stored factory data.
How the User Parameters Mask Applies Offsets
When you enter correction values in the User Parameters Mask:
Factory data remain unchanged.
The system applies the entered value as an offset.
After calibration, Y1 resets to 230.84 mm.
Y2 resets to 230.19 mm.
This means the User Parameters Mask works as a compensation layer. The original axis calibration remains intact, ensuring traceability and system safety.
This approach is especially useful when small mechanical deterioration affects repeatability. Instead of performing full recalibration procedures, operators can safely compensate through the User Parameters Mask.
How to Save Adjustments in ESA S875 User Parameters Mask
After entering calibration corrections, it is essential to save the parameters properly.
To save:
1. Press the save key.
2. The system will store the updated data in the file UserTara.par.
Saving ensures that corrections remain active after system restart. If you do not save the parameters, the changes will not be retained.
The ESA S875 User Parameters Mask separates temporary adjustments from permanent storage, which prevents accidental data loss.
What Happens When Factory Calibration Data Changes
If the press manufacturer updates the factory resetting heights of the axes, the User Parameters Mask automatically detects inconsistencies between the stored correction and the new baseline.
In this situation:
A warning message appears on the display.
The related correction value is automatically reset.
The calibration height returns to the updated factory reference.
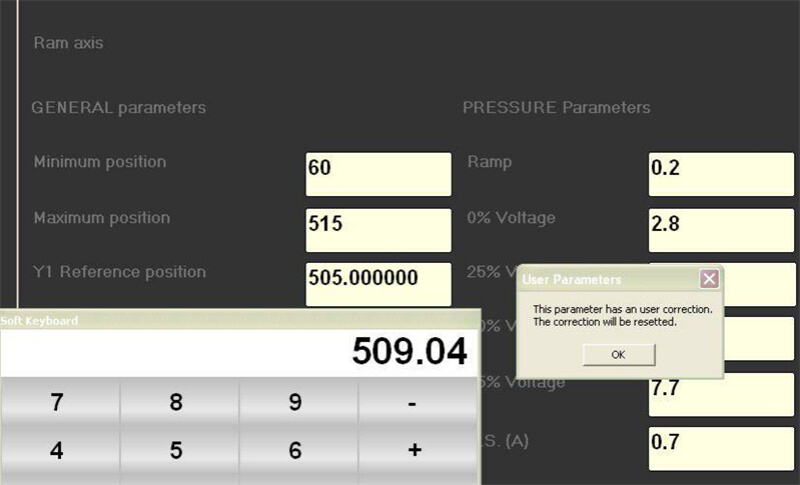
After the reset, the axis calibration correction table reflects the new factory baseline.
This automatic protection mechanism ensures that adjustments inside the ESA S875 User Parameters Mask do not conflict with manufacturer updates.
Other Adjustable Settings in ESA S875 User Parameters Mask
In addition to axis calibration corrections, the User Parameters Mask provides access to other operational settings.
These include parameters related to:
Axis Parameters
General Configuration Parameters
General Parameters
The key difference is that these parameters are accessible without password authentication when using the ESA S875 User Parameters Mask. However, only selected and safe-to-modify data are displayed.
This controlled access structure allows operators to optimize workflow and adjust operational details without risking core system stability.
Step-by-Step Guide to Adjust ESA S875 User Parameters Mask Safely
To ensure safe and accurate modification of the ESA S875 User Parameters Mask, follow this structured process:
Step 1: Verify Mechanical Condition
Before entering any correction, measure the actual axis resetting height using accurate tools. Confirm that deviation is mechanical and not caused by programming errors.
Step 2: Calculate the Required Offset
Determine the difference between factory resetting height and measured value. Enter only the calculated correction value, not the final height.
Step 3: Enter Correction Values Carefully
Input the offset directly into the Y1 or Y2 field within the ESA S875 User Parameters Mask. Double-check numerical accuracy before confirming.
Step 4: Save Parameters
Press the save key to store the new correction values in UserTara.par.
Step 5: Perform Test Calibration
Run a reset cycle and verify that the axis reaches the corrected height accurately.
Following this method ensures that the ESA S875 User Parameters Mask is used as a precision adjustment tool rather than a trial-and-error solution.
Best Practices for Long-Term Stability
To maintain safe operation when working with the ESA S875 User Parameters Mask:
· Apply small incremental corrections.
· Record original factory values before adjustment.
· Avoid modifying unrelated parameters.
· Recheck axis positioning periodically.
· Coordinate with technical support if large deviations appear.
Using the ESA S875 User Parameters Mask responsibly ensures that mechanical wear compensation is controlled, calibration remains stable, and factory integrity is preserved.
By fully understanding how the User Parameters Mask works, operators can confidently adjust axis calibration corrections and other permitted parameters while maintaining machine accuracy and long-term performance reliability.
Conclusion
Proper configuration of the ESA S875 User Parameters Mask plays a key role in maintaining accurate press brake calibration and ensuring stable machine performance. By correctly adjusting axis calibration corrections—such as Y1 and Y2 resetting heights—and saving the updated parameters, operators can effectively compensate for mechanical wear without altering the original factory settings.
Regularly checking and managing the User Parameters Mask helps sustain consistent bending accuracy and reliable machine operation. If you need further guidance on ESA controller settings or press brake optimization, feel free to contact our technical team or explore more of our technical support articles.

