


Dominando a Calibração do Eixo X no Controlador E21 para Dobragem de Precisão
Suas dobras estão constantemente desalinhadas? A calibração incorreta do eixo X no Controlador E21 é muitas vezes a causa raiz. Este guia fornece um procedimento claro e passo a passo de calibração para ajudá-lo a obter resultados perfeitos de dobragem todas as vezes.
A calibração adequada do eixo X é essencial para manter a precisão nas operações de dobragem com freio-prensa. Siga esta abordagem estruturada para otimizar o desempenho do seu Controlador E21 e garantir precisão dimensional em todos os seus projetos de dobragem.
Processo de Calibração:
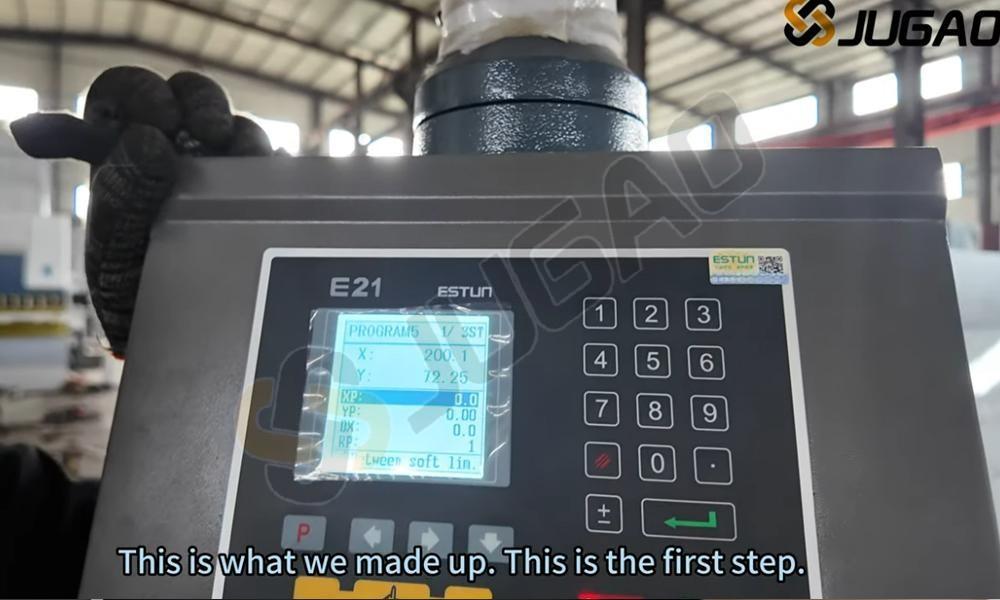
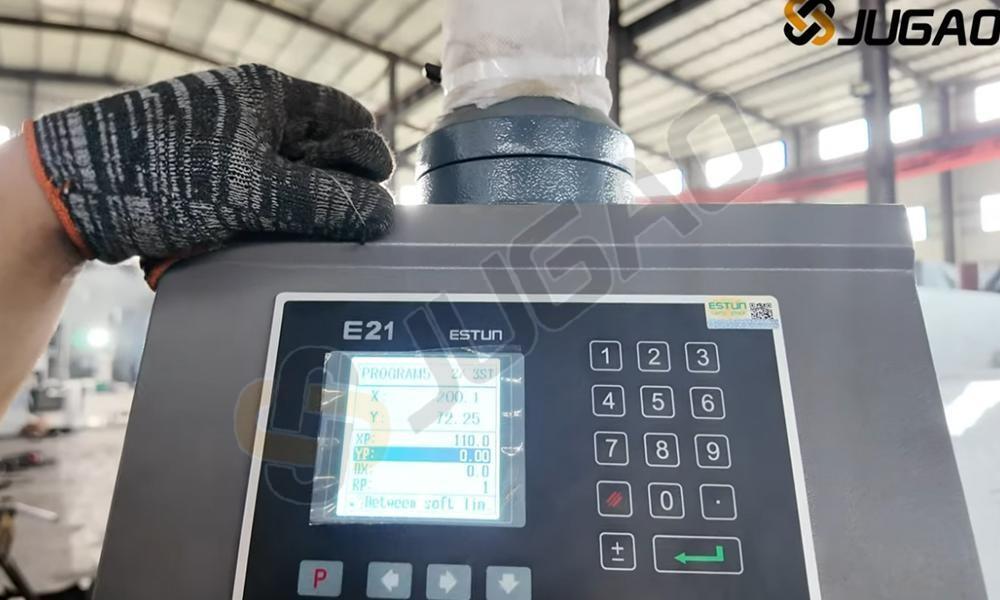
1. Programar e definir XP para 25 mm:
● Acesse a interface de programação do seu controlador E21
● Insira 25 mm como valor alvo de XP (posição da régua traseira)
● Esta configuração determina a posição exata de parada da régua traseira
● Confirme a entrada e prossiga para as próximas etapas
● Verifique cuidadosamente esta configuração para evitar desalinhamento na dobragem
● Ajuste de acordo com as especificações do material e requisitos de dobragem, conforme necessário
● Uma calibração precisa do eixo X garante ângulos de dobragem consistentes e melhora a precisão operacional geral
2. Execute a máquina:
● Com o valor XP configurado, inicie a sequência de dobragem
● Confirme que o posicionamento do batente traseiro está alinhado com a sua configuração XP
● Realize uma dobra de teste usando material de amostra para validar a precisão da calibração
● Monitore o ângulo de dobragem e o posicionamento durante todo o processo
● Verifique se o batente traseiro para na distância programada
● Faça ajustes incrementais no valor XP, se necessário
● Após validado, inicie as produções com confiança nos seus resultados precisos de dobragem

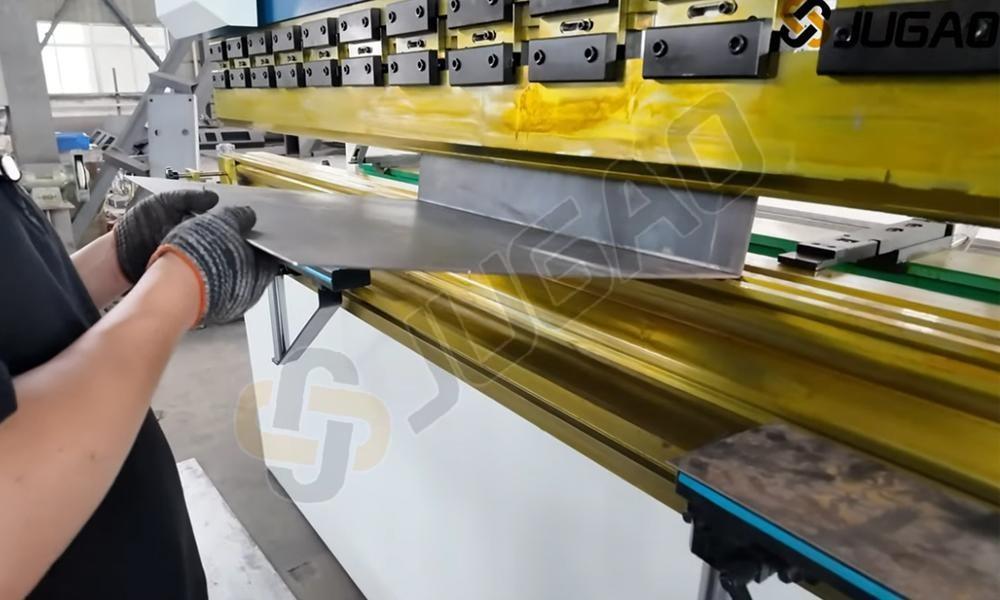
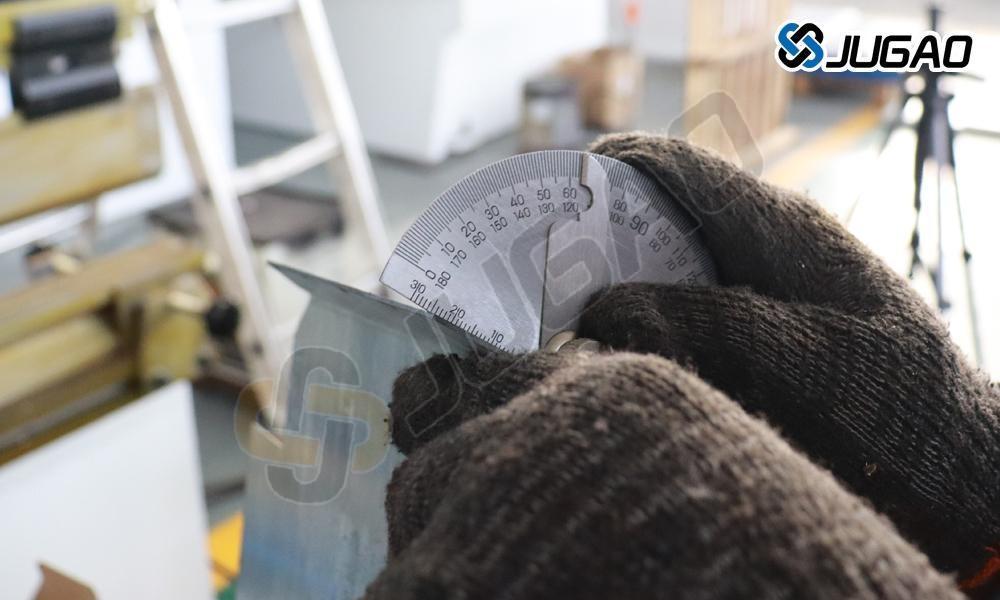
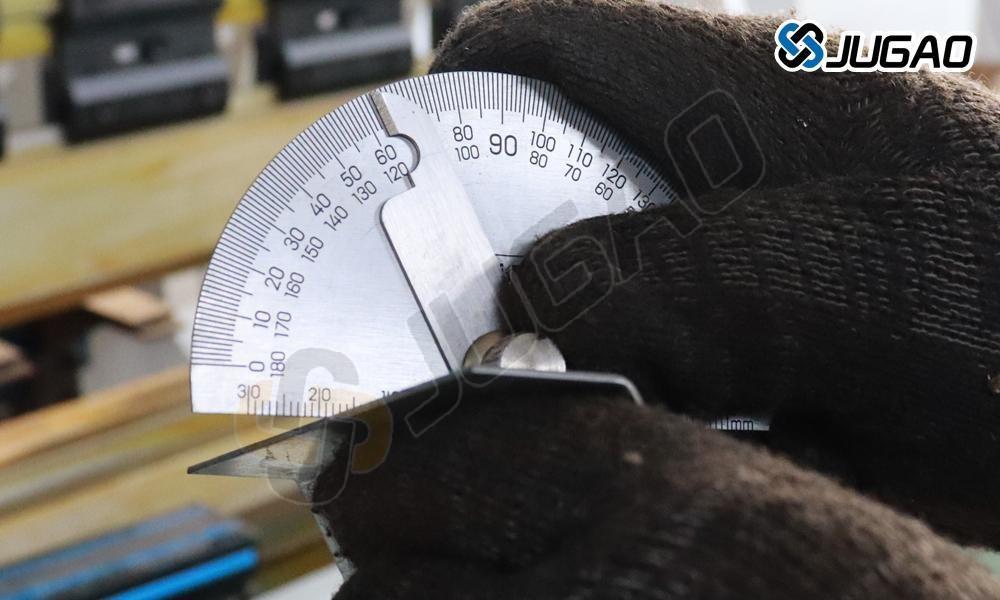
3. Meça a chapa dobrada:
Após concluir o processo de dobragem, meça cuidadosamente o comprimento real da chapa dobrada utilizando um paquímetro ou fita métrica para garantir a precisão. Qualquer discrepância indica que a posição do eixo X precisa ser calibrada para obter resultados precisos de dobragem. Um ajuste incorreto do eixo X pode provocar variações nas dimensões da dobragem, afetando a qualidade geral do produto final. Para corrigir isso, devem ser feitos ajustes nos parâmetros do eixo X do controlador E21, assegurando que o material seja posicionado com exatidão antes da próxima dobragem.
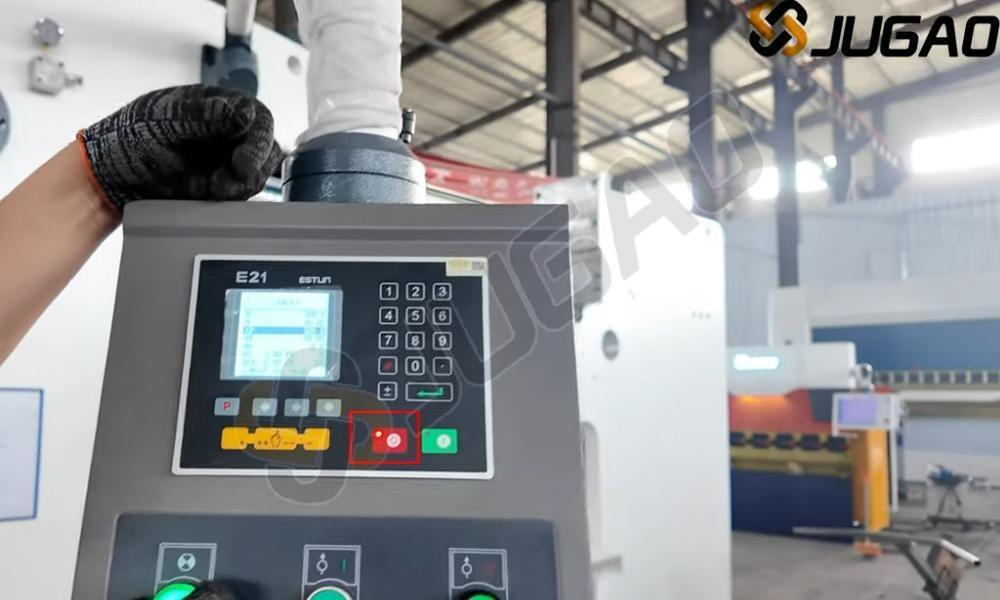
4. Pare a máquina:
Pressionar o botão vermelho PARAR no controlador E21 é uma medida de segurança crucial para interromper temporariamente as operações da máquina. Esta função é essencial quando são necessários ajustes, ocorrem erros ou surgem situações de emergência. Uma vez pressionado, a máquina parará imediatamente, impedindo qualquer movimento adicional dos componentes da dobradeira. Este recurso ajuda os operadores a evitar danos potenciais às peças e garante a segurança no local de trabalho. Para retomar as operações, verifique se todas as configurações estão corretas, remova quaisquer obstruções e reinicie o sistema conforme necessário. Utilize sempre o botão PARAR com responsabilidade e em conformidade com as orientações de segurança para manter o desempenho ideal da máquina e a proteção do operador.
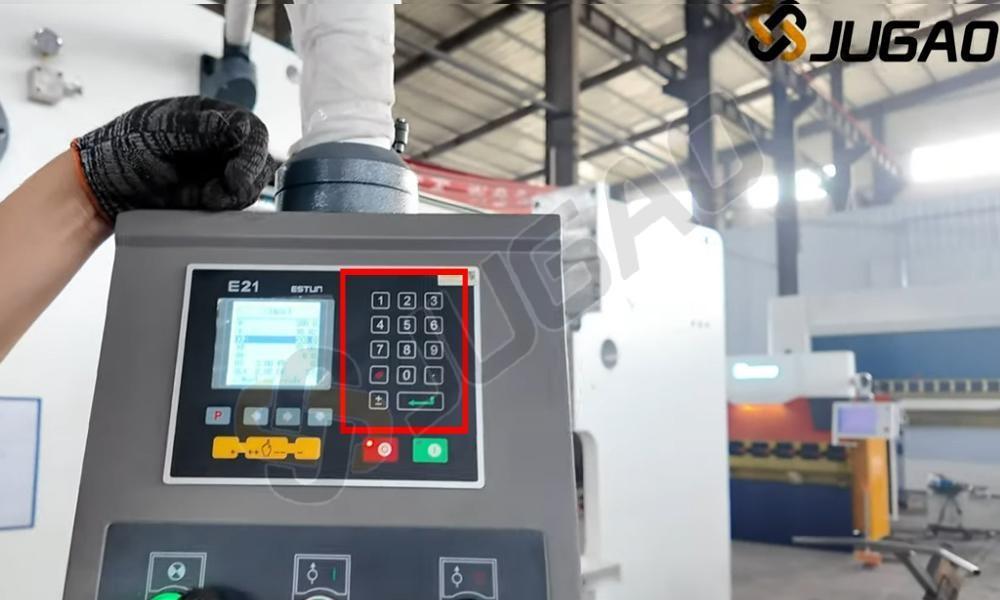
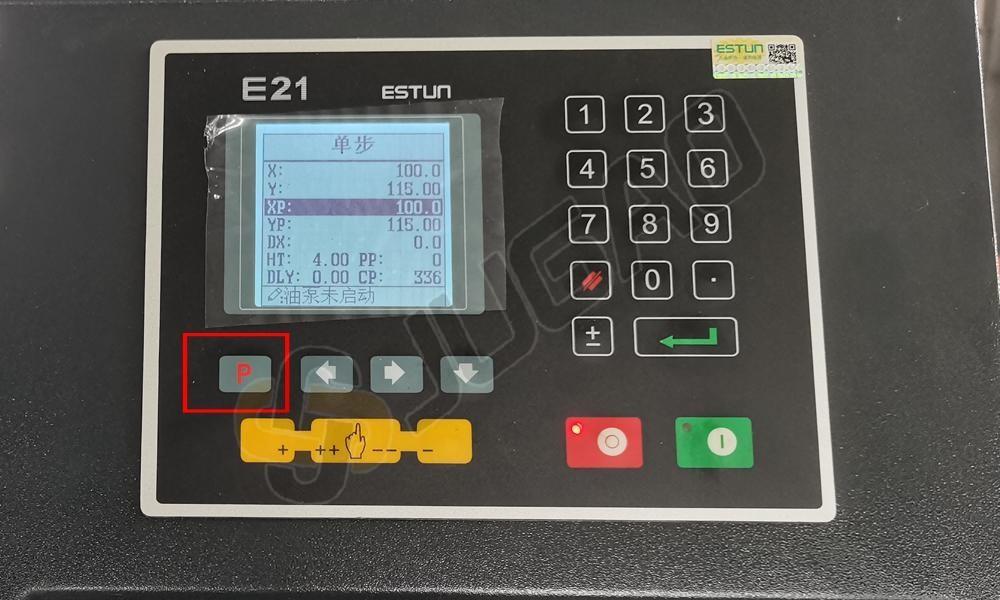
5. Acessando o Menu de Calibração
• Clique duas vezes no botão P para entrar no ambiente de programação
• Esta interface permite a configuração dos parâmetros de dobragem e a calibração dos eixos
• Configure o posicionamento do eixo X (batente traseiro) para obter o posicionamento ideal do material
• Defina as posições desejadas da régua traseira e sequências de dobragem com múltiplos passos
• Otimize as configurações de calibração para diferentes materiais e espessuras
• A calibração adequada do eixo X melhora a precisão e a repetibilidade da dobragem
• Sempre verifique as configurações com dobras de amostra antes de iniciar produções completas
6. Insira a senha:
Quando o sistema solicitar uma senha, insira-a e pressione o botão ENTER para confirmar. Esta ação concede acesso à página TEACH, onde você pode prosseguir com o processo de calibração do eixo X. A página TEACH permite aos usuários definir e ajustar parâmetros da máquina, garantindo controle preciso sobre o posicionamento da régua traseira. A calibração adequada do eixo X é essencial para obter resultados precisos na dobragem. Se encontrar algum problema ao inserir a senha ou acessar a página TEACH, consulte o manual da máquina ou entre em contato com o suporte técnico da JUGAO para assistência.
7. Calibre o eixo X:
● Na página TEACH do controlador E21, navegue até o primeiro item, que está diretamente relacionado à calibração do eixo X. Esta função permite ajustar com precisão a posição do batente traseiro, garantindo resultados exatos na dobragem. Ao selecionar esta opção, é possível entrar no modo de calibração, onde se pode definir a posição de referência e ajustar finamente o movimento do eixo X. Siga as instruções exibidas na tela para inserir as medidas corretas e confirmar a calibração. Uma calibração adequada garante que o batente traseiro se mova de acordo com os valores programados, reduzindo erros de dobragem e melhorando a precisão geral. A calibração regular do eixo X ajuda a manter um desempenho consistente e alta precisão nas operações de dobragem de metais.
● Neste campo, insira o comprimento medido real. Esta etapa garante que a dobradeira reconheça com precisão o posicionamento real do batente traseiro. A inserção precisa deste valor é essencial para alcançar uma precisão consistente na dobragem. Se o comprimento medido diferir do valor predefinido, ajustá-lo aqui permite que o controlador E21 compense quaisquer discrepâncias, melhorando a repetibilidade. Após inserir o comprimento correto, confirme a entrada pressionando a tecla apropriada. Esta etapa de calibração ajuda a eliminar erros no movimento do eixo X, assegurando dobras de alta precisão e reduzindo o desperdício de material.
● Após ajustar as configurações de calibração do eixo X no controlador E21, pressione o botão ENTER para confirmar e aplicar as alterações. Esta etapa garante que a nova posição do batente traseiro seja registrada com precisão no sistema. Uma vez aplicada, a unidade de controle atualizará suas medidas internas, permitindo operações de dobragem precisas. É essencial verificar a calibração realizando uma dobra de teste e medindo os resultados. Se necessário, refine os ajustes para obter precisão ideal. A calibração correta do eixo X melhora a repetibilidade e assegura que cada dobra atenda às especificações exigidas, reduzindo o desperdício de material e aumentando a eficiência da produção.
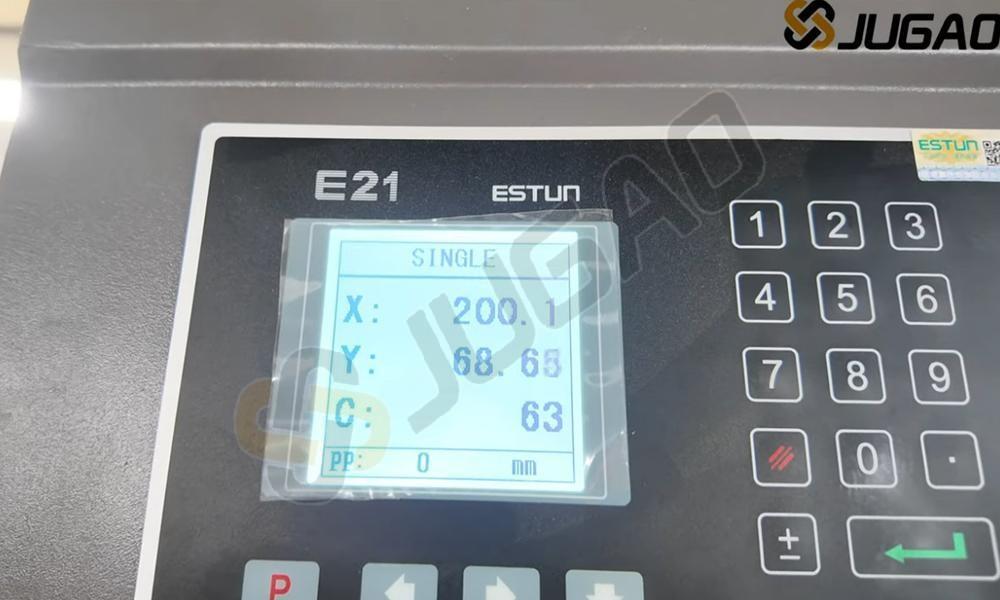
8. Retorne à página ÚNICA:
Clique duas vezes no botão P novamente para retornar à página SINGLE no controlador E21. Esta ação garante que o sistema saia da interface de configuração de parâmetros e retorne à tela padrão de operação. A página SINGLE é a interface padrão onde você pode definir e ajustar programas de dobragem para sua dobradeira. Ao voltar a esta página, o controlador fica pronto para operação normal, permitindo que você prossiga com as tarefas de dobragem. Se necessário, você pode reentrar nas configurações de parâmetros pressionando novamente o botão P, garantindo ajustes contínuos na calibração do eixo X ou em outras configurações da máquina.
9. Refaça o teste dobrando outra chapa:
● Realize outra operação de dobragem utilizando as mesmas configurações e meça cuidadosamente as dimensões resultantes da chapa. Certifique-se de que a medição seja feita com precisão usando um paquímetro ou outras ferramentas de medição precisas. Compare a posição real da dobra com o valor programado no controlador E21. Se a medição ainda se desviar do valor esperado, faça ajustes menores nas configurações do eixo X conforme necessário. Repita este processo até que o resultado da dobragem corresponda às especificações desejadas. Uma calibração adequada garante alta precisão na dobragem de metais, reduz o desperdício de material e melhora a eficiência geral da produção. Sempre verifique várias vezes para obter o alinhamento mais preciso possível.

● A etapa final no processo de calibração do eixo X é medir o comprimento real da dobra da peça. Após realizar o ajuste e efetuar uma dobra de teste, utilize uma ferramenta de medição precisa para verificar o comprimento da aba. Se a medição estiver incorreta, repita as etapas de calibração e faça ajustes finos conforme necessário. Um eixo X corretamente calibrado melhora significativamente a precisão de dobragem, minimiza erros e aumenta a eficiência geral na fabricação de chapas metálicas.
Ao seguir sistematicamente este protocolo de calibração, você pode manter o desempenho ideal do eixo X no seu controlador E21. A calibração regular garante precisão contínua e maximiza a eficiência operacional da sua dobradeira.

