


Przewodnik po prawidłowym włączaniu funkcji systemu ESA S640
Włączenie funkcji maszyny do obróbki metali ESA S640 może znacznie wzmocnić możliwości obróbki metali, umożliwiając dostęp do zaawansowanych funkcji, takich jak funkcja „Nowe gięcie” oraz wymuszanie gięcia holenderskiego. Jeśli dążysz do maksymalizacji wydajności swojego sprzętu, trafiłeś w odpowiednie miejsce. Ten przewodnik zawiera jasne, krok po kroku instrukcje aktywacji funkcji ESA S640, dzięki czemu możesz w pełni wykorzystać jej potencjał w precyzyjnych zadaniach kształtowania metali.
Niezależnie od tego, czy jesteś nowym użytkownikiem systemu, czy doświadczonym operatorem, zrozumienie sposobu włączania i precyzyjnej regulacji tej funkcji jest kluczowe dla zoptymalizowania przepływu pracy oraz osiągnięcia doskonałych wyników gięcia. Dzięki odpowiedniej konfiguracji urządzenie ESA S640 może przekształcić skomplikowane operacje w płynne i wydajne procesy – zwiększając jednocześnie produktywność i dokładność w Twojej warsztatowej pracowni.
Włączanie funkcji „Maszyna do obróbki metali”
Włączenie funkcji maszyny do obróbki metali ESA S640 otwiera zaawansowane możliwości w Twojej pracy. Poniżej znajduje się szczegółowy przewodnik po jej włączeniu:
Krok 1: Wejście na stronę konfiguracji
Z poziomu strony Edytora naciśnij klawisz, aby otworzyć menu.
Wybierz pozycję 2 >> Konfiguracja, aby przejść na stronę konfiguracji.
Krok 2: Wejście do parametrów maszyny
Wybierz pozycję 6 >> Parametry maszyny.
Wprowadź wymagane hasło i naciśnij przycisk [OK].
Naciśnij klawisz Parametry 2.
Krok 3: Włącz maszynę do obróbki metalu
Wprowadź wartość 1 w polu „Maszyna do obróbki metalu” znajdującym się w grupie parametrów „Funkcje pomocnicze”.
Wynik: Po zakończeniu tej operacji obie funkcje wymuszania gięcia – „Nowe gięcie” i „Gięcie holenderskie” – zostaną włączone, co zwiększy funkcjonalność maszyny.
Jak korzystać z funkcji „Nowe gięcie”
Funkcja „Nowe gięcie” ułatwia tworzenie gięć z spójnymi danymi, optymalizując proces gięcia:
Funkcja następnego gięcia: Naciśnięcie przycisku w momencie, gdy znajdujesz się na ostatnim gięciu, powoduje dodanie nowego gięcia z danymi identycznymi jak poprzednie gięcie.
Funkcja wstawienia kroku: Wybierz opcję „Wprowadź krok” z menu, aby dodać nowe gięcie w bieżącej pozycji, kopiując dane z poprzedniego gięcia.
Uwaga: Uważaj, aby przypadkowo nie dodać gięcia zamiast przewijać listę. Aby poruszać się po liście gięć, używaj przycisków nawigacyjnych, a przycisku [Nowy krok] – do tradycyjnego dodawania nowego kroku – zawsze, gdy ta funkcja nie jest aktywna.
Wymuszanie gięcia holenderskiego
Po włączeniu funkcji maszyny do obróbki metalu ESA S640 wykonywanie zgięcia holenderskiego staje się proste i efektywne:
Ta zaawansowana funkcja, dostępna zarówno na stronie Edytora, jak i na stronie Podsumowanie zgięć, umożliwia użytkownikom wykonywanie zgięcia holenderskiego przy minimalnym wysiłku. Ustawienie pola Kąt Y1 na wartość 0 skutecznie konfiguruje system do obsługi zgięć holenderskich. Proces ten zapewnia spójną dokładność i precyzję przy tworzeniu tych złożonych zgięć.
Korzyści wynikające z zastosowania zgięcia holenderskiego:
Spójność: Zapewnia jednolitość w podobnych projektach, utrzymując wysoką jakość i ograniczając margines błędu.
Precyzja i kontrola: Automatyzacja procesu ustawiania pozwala operatorom osiągać bardzo precyzyjne kąty zgięcia bez konieczności dokonywania ręcznych korekt.
Zwiększone efektywności: Szybka konfiguracja zmniejsza przestoje, umożliwiając płynne przełączanie się między różnymi zadaniami gięcia i zwiększając produktywność.
Wielofunkcyjność: Ta elastyczna funkcja obsługuje różne potrzeby obróbki metali, dostosowując się z łatwością zarówno do prostych, jak i skomplikowanych projektów.
Zrozumienie ikony ostatniego zgięcia

W interfejsie ESA S640 ikona ostatniego zgięcia stanowi kluczowy sygnał wizualny dla operatorów, wskazując, że aktualne zgięcie jest ostatnim w danej sekcji.
Ta funkcja jest niezbędna do zapobiegania przypadkowemu dodawaniu nowych zgięć, które mogą zakłócić kolejność operacji.
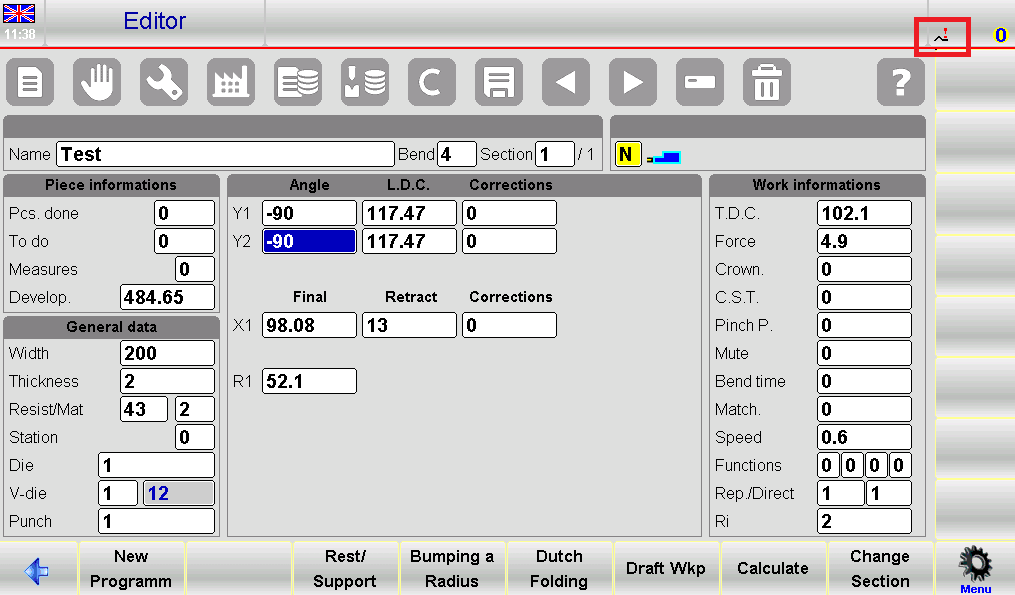
Znaczenie ikony ostatniego zgięcia :
Zapobieganie błędom: Ikona działa jako przypomnienie, pomagając operatorom uniknąć przypadkowego dodawania zgięć poza zaplanowaną kolejnością.
Przyjazny dla użytkownika interfejs: Umieszczona w prawym górnym rogu ekranu, jak pokazano na rysunku 59, ikona zapewnia wyraźną i natychmiastową informację o stanie kolejności zgięć.
Efektywność przepływu pracy: Sygnalizując ostatnie zgięcie, wspiera zachowanie spójności aktualnej konfiguracji zgięć, optymalizując przepływ pracy i zmniejszając konieczność wprowadzania poprawek.
Podsumowanie
Aktywacja funkcji maszyny do obróbki metalu ESA S640 wymaga solidnej znajomości interfejsu systemu oraz precyzyjnej konfiguracji jej ustawień. Rozpocznij od przejścia do głównego menu i wybrania opcji „Maszyna do obróbki metalu”. Następnie postępuj zgodnie z instrukcjami wyświetlanymi na ekranie, aby skalibrować parametry zgodnie ze specyficznymi wymaganiami Twojego projektu. Zalecane jest przetestowanie konfiguracji przy użyciu próbki materiału w celu zweryfikowania zarówno dokładności, jak i wydajności działania. Aby zapewnić długotrwałą wydajność, regularnie aktualizuj oprogramowanie systemu.
Poprawna konfiguracja funkcji ESA S640 jest kluczowa do wykorzystania jej pełnego potencjału oraz zapewnienia spójnych wyników w różnych zadaniach. W razie potrzeby dodatkowych wskazówek lub pomocy w ustawieniach zaawansowanych nie wahaj się skontaktować z naszym zespołem wsparcia technicznego. Aby dogłębnie zapoznać się z powiązanymi tematami, zapoznaj się z naszą obszerną biblioteką dokumentacji, która zawiera szeroki wybór artykułów i materiałów dotyczących różnych systemów obróbki metali oraz technik eksploatacji.

