


NC սեղմման ճնշակի գլխի կնքման օղակի փոխարինման ուղեցույց
Արդյոք ձեր NC պրես-արտամղիչը նշաններ է ցուցադրում կորուստների կամ կատարման նվազման վերաբերյալ։ Շահագործման արդյունավետությունը վերականգնելու և թանկարժեք վերանորոգման կորուստներից խուսափելու համար անհրաժեշտ է փոխել սիլինդրի կնիքները։ Որպես հիդրավլիկական ճնշման ապահովման և կորուստները կանխարգելող հիմնարար նորոգման գործողություն՝ NC պրես-արտամղիչի սիլինդրի կնիքների փոխարինումը պարզ, սակայն կարևոր քայլ է, որը անհրաժեշտ է սարքավորումների հուսալի աշխատանքի և ծառայողական ժամկետի երկարաձգման համար։
Կնիքները ենթարկվում են մաշվածության և տարիքային փոփոխությունների՝ երկարատև ենթարկվելով բարձր ճնշման, բարձր ջերմաստիճանի և շփման, ինչը կարող է հանգեցնել հիդրավլիկական յուղի կորուստների և սարքավորումների վատ աշխատանքի։ Ստորև ներկայացված է NC պրես-արտամղիչի սիլինդրի կնիքների անվտանգ և արդյունավետ փոխարինման մանրամասն ուղեցույց։
I. Անվտանգությունը առաջին հերթին
Ցանկացած աշխատանք սկսելուց առաջ համոզվեք, որ հիդրավլիկ համակարգը լիովին դեպրեսացված է, և սարքավորումը անջատված է: Միաժամանակ կրեք պրոֆեսիոնալ պաշտպանական հագուստ, ինչպիսիք են ձեռնոցները և ակնոցները՝ շահագործման անվտանգությունն ապահովելու համար:
II. Պատրաստեք անհրաժեշտ գործիքները
Նախապես պատրաստեք բաղնիքներ, պտուտակահաններ, շղթայակալներ, կնիքի հանող, փայտաձող և փոխարինող կնիքի օղակներ: Նկատի ունեցեք, որ փոխարինող կնիքի օղակները պետք է ճշգրիտ համապատասխանեն սիլինդրի մոդելին՝ չհամապատասխանող սպեցիֆիկացիաների պատճառով կնքման ազդեցությունը խաթարելու հնարավորությունը բացառելու համար:
III. Մուտք ստացեք սիլինդր
Կախված սարքավորման կոնկրետ կառուցվածքից՝ կարող է անհրաժեշտ լինել հեռացնել պաշտպանիչ ծածկեր, կողպեր կամ այլ հարակից բաղադրիչներ՝ սիլինդրին հարմարավետ մուտք ստանալու համար:
IV. Ճնշման ազատում և անջատում
Եթե բալոնը դեռևս ճնշման տակ է, օգտագործեք մասնագիտական մեթոդներ ճնշումը թեթևացնելու համար՝ մնացորդային ճնշման հետևանքով առաջացող անվտանգության հնարավոր վտանգները կանխելու համար: Հետագայում անջատեք բալոնին միացված բոլոր հիդրավլիկ խողովակները և միակցիչները:
Վ. Հեռացրեք սիլինդրը
Ըստ սարքավորման տեղադրման մեթոդի՝ պտուտակները հանեք սիլինդրին ամրացված պտուտակները և հեռացրեք սիլինդրը ամրացման սայլակից կամ միացման կետից։ Նկատի ունեցեք, որ սիլինդրը ծանր է՝ հեռացնելիս զգուշությամբ վերաբերվեք, որպեսզի խուսափեք բախումներից կամ անձնական վնասվածքներից։
Տ. Բացեք սիլինդրը
Սիլինդրը հեռացնելուց հետո զգուշությամբ բացեք այն։ Բացման ընթացքում հատկապես նշեք յուրաքանչյուր մասի տեղադրման հերթականությունը և կնիքերի օղակների ուղղությունը՝ հետագա վերահավաքածուի համար որպես տեղեկություն օգտագործելու համար։
Կարող եք վերաբերվել համապատասխան տեսանյութերին՝ սիլինդրի մասերը հերթականությամբ բացելու համար. նախ շարժեք մխոցի դարանը ներքև՝ մինչև անշարժ դիրք, ապա պտուտակները հանեք, և հետո հանեք մխոցի դարանի ներսում գտնվող պտուտակը և մխոցի թասը։ Բացելիս բոլոր մասերը և պտուտակները պետք է ապամուղանան հակային ուղղությամբ։
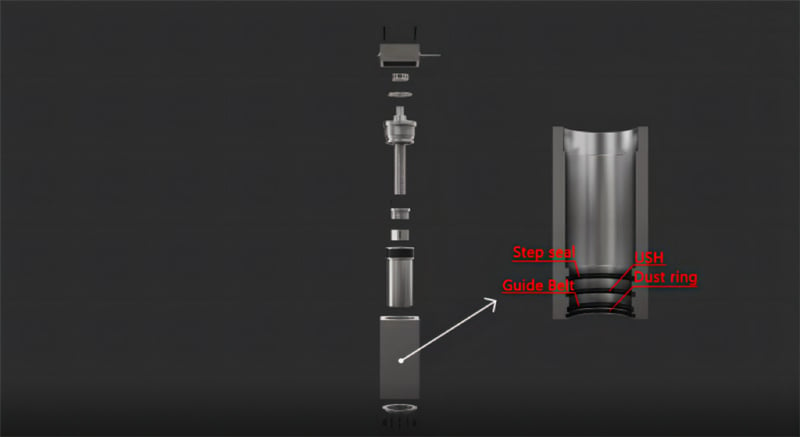
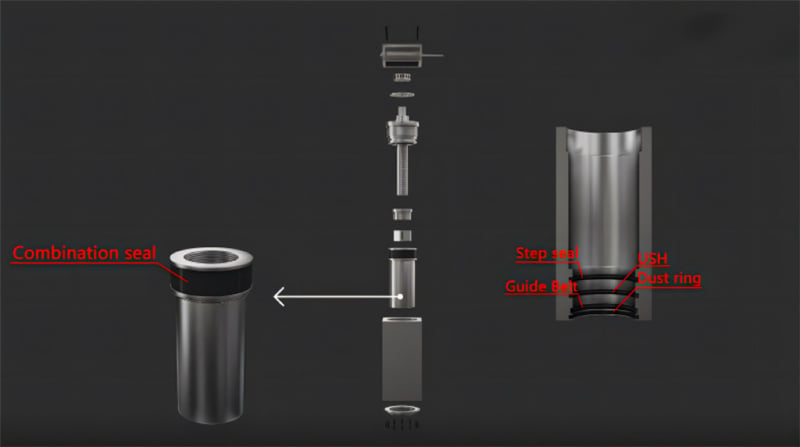
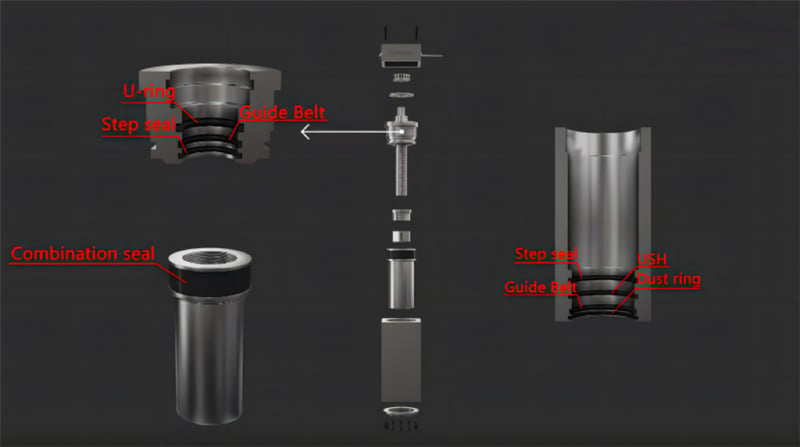
Սիլինդրի յուրաքանչյուր մասում կնիքերի բաշխումը հետևյալն է.
1. Բեռնագնացի մարմինը սարքավորված է քայլային աստիճաններով, USH աստիճաններով, ուղղորդող գոտիներով և փոշիի օղներով (Տեսադիագրամը՝ JUGAO հարաբերական բաղադրիչները՝ Բեռնագնացի մարմին, Ուղղորդող խողովակ, Բեռնագնացի ձող, Ծանկ, Բեռնագնացի ափսե, Բոլտեր, Բեռնագնացի գլուխ, Օղակ, Թուրբին, Թուրբինի տուփ).

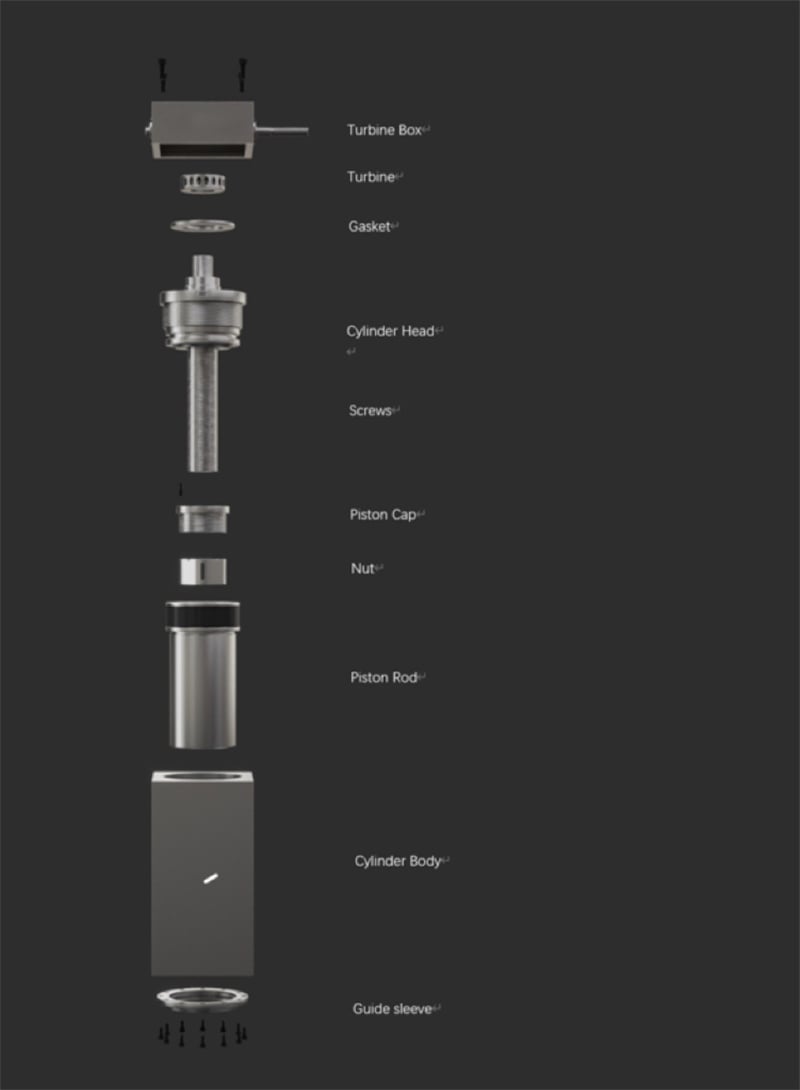
2. Բեռնագնացի ձողի վերևի մասը սարքավորված է համակցված աստիճաններով (Տեսադիագրամը՝ JUGAO հարաբերական բաղադրիչները՝ Քայլային աստիճան, USH աստիճան, Փոշիի օղակ, Ուղղորդող գոտի).
3. Բեռնագնացի գլուխը սարքավորված է քայլային աստիճաններով, U-աղեղներով և ուղղորդող գոտիներով (Տեսադիագրամը՝ JUGAO հարաբերական բաղադրիչները՝ Համակցված աստիճան, Քայլային աստիճան, USH աստիճան, Փոշիի օղակ, Ուղղորդող գոտի).
4. Բոլոր բաղադրիչները պետք է վերամիավորվեն «տեղադրման և հանման հակառակ կարգով» (Տեսադիագրամը՝ JUGAO հարաբերական բաղադրիչները՝ U-օղակ, Ուղղորդող գոտի, Քայլային աստիճան, Համակցված աստիճան, Քայլային աստիճան, USH աստիճան, Փոշիի օղակ, Ուղղորդող գոտի).
(I) Հեռացնել հին աստիճանները
Օգտագործեք աստիճանի քաշողը կամ հարմար գործիքը՝ հին աստիճանները հանելու համար։ Գործարարեք փոքր ուժով՝ խոչը անոթի խողովակի վրա գծելու կամ այլ բաղադրիչներին վնաս հասցնելու։
(II) Մաքրել և ստուգել
Խողովակի խողովակաձև խողովակը և բոլոր ապամոնտավորված բաղադրիչները մաքրեք հիմնավորապես՝ հեռացնելով յուղի բծերը, անխոտները և հետանշանակման հերմետիկը: Միաժամանակ, ուշադիր ստուգեք յուրաքանչյուր բաղադրիչ մաշվածության, դեֆորմացիայի կամ վնասվածության համար: Եթե հայտնաբերվեն ցանկացած խնդիր, անհապաղ փոխարինեք դրանք՝ խուսափելով բաղադրիչների թերությունների կապակցությամբ հերմետիկի ձախողմանից:
(III) Տեղադրեք նոր հերմետիկներ
Լուսավորեք նոր հերմետիկները հիդրավլիկ յուղով և ուշադիր տեղադրեք դրանք նշանակված դիրքերում: Համաշխարհային հարմարեք, որ հերմետիկները ճիշտ տեղադրված են և չեն պտույտ, որպեսզի երաշխավորեք հերմետիկացման աշխատանքը:
(IV) Վերամոնտավորեք խողովակը
Վերամոնտավորեք խողովակի բաղադրիչները ապամոնտավորման հակադարձ կարգով: Կապեք պտուտները խիստ համապատասխան արտադրողի նշած ստանդարտներին՝ խուսափելով սարքավորման աշխատանքի վրա ազդելու համար պտուտների անջատման կամ չափազանց կապման հետևանքներից:
(V) Վերատեղադրեք խողովակը
Վերատեղադրեք վերամոնտավորված խողովակը սարքավորման վրա, միացեք հիդրավլիկ խողովակներն ու միացող մասերը և համաշխարհային հարմարեք, որ բոլոր բաղադրիչները ամրապես ամրացված են և չեն անջատվում:
(VI) Փորձարկման գործառություն
Վերահավաքածուից հետո սկզբում ագրեգատը միացրեք փորձարկման համար՝ ստուգելու, թե արդյոք շահթը հարմար կերպով է աշխատում և հիդրավլիկ համակարգում արտահոսք չկա։ Եթե հայտնաբերվեն անսաղմանցիկություններ, անմիջապես անջատեք սարքը խափանումները վերացնելու համար:
VII. Հիդրավլիկ շահթերի ամենօրյա խնամքի հանձնարարականներ
Հիդրավլիկ շահթերի ճիշտ ամենօրյա խնամքը կարող է արդյունավետ երաշխավորել դրանց աշխատանքային արդյունավետությունը և երկարացնել ծառայողական ժամկետը։ Ստորև ներկայացված են ընդհանուր խնամքի մի քանի առաջարկություններ.
1. Պարբերաբար ստուգեք յուղի մակարդակը. Պարբերաբար ստուգեք շահթի հիդրավլիկ յուղի մակարդակը՝ համոզվելու, որ այն նշված սահմանների սահմաններում է։ Շատ ցածր յուղի մակարդակը կարող է հեշտությամբ վնասել շահթը և ազդել սարքավորումների սովորական աշխատանքի վրա.
2. Ժամանակին փոխեք հիդրավլիկ յուղը. Հիդրավլիկ յուղի աղտոտմունքի և վատթարացման կանխարգելման համար անհրաժեշտ է այն կանոնավոր փոխարինել։ Յուղի փոխարինման հաճախադեպությունը պետք է ճկուն կերպով կարգավորվի՝ կախված սարքավորումների օգտագործման դեպքից և շահագործման պայմաններից.
3. Պարբերաբար ստուգեք արտահոսքերը. Պարբերաբար ստուգեք ցիլինդրը և հիդրավլիկ համակարգը հորդալու նկատմամբ: Եթե հայտնաբերվեն հորդալներ, անմիջապես վերացրեք դրանք՝ հիդրավլիկ յուղի կորուստը և սարքավորման մասերի վնասումը կանխարարելու համար:
4. Ստուգեք փականքի օղակների վիճակը. Պարբերաբար ստուգեք փականքի օղակները մաշվածության, հնացման և վնասվածության նկատմամբ: Ժամանակին փոխարինեք այն փականքի օղակները, որոնք ունեն խնդիր, որպեսզի կանխարարեք փականքի ձախողմանով պայմանավորված հորդալը.
5. Պահեք ցիլինդրը մաքուր. Պարբերաբար սրբեք ցիլինդրի մակերևույթը մաքուր կտորով՝ հեռացնելով փոշին, յուղի բծերն ու այլ աղտեր, որպեսզի կանխարարեք աղտոտիչների ներթափանքումը ցիլինդրի մեջ և դրանից հետևանքային վնասը.
6. Օգտագործեք նշված հիդրավլիկ յուղը. Խիստ կարգավիճակի մեջ օգտագործեք արտադրողի կողմից առաջարկված հիդրավլիկ յուղը, որը համատեղելի է ցիլինդրի և սարքավորման հետ: Մի օգտագործեք սխալ սպեցիֆիկացիայով հիդրավլիկ յուղ, քանի որ դա կարող է վնասել ցիլինդրը և հիդրավլիկ համակարգի այլ մասերը:
Վերը նշված սպասարկման խորհուրդները հետևելով՝ կարող եք արդյունավետ ապահովել հիդրավլիկ բեռնաթողանքների կայուն աշխատանքը, երկարացնել դրանց ծառայության ժամկետը և ապահովել NC ճնշակների արդյունավետ աշխատանքի համար վստահելի աջակցություն:

