


Hogyan vezessük be sikeresen az ET sorozatú formabeállítást
Ha elsajátítaná az ET sorozatú szerszámozás beállítását teljesen elektromos szervó hajtású hajlítógépe esetén, akkor éppen a megfelelő helyre érkezett. Útmutatást nyújtok az alapvető lépésekhez, amelyek segítségével sikeresen implementálhatja ezt a funkciót, és pontossággal és hatékonysággal optimalizálhatja hajlítási folyamatait. Az ET sorozatú szerszámozás beállításának megértése elengedhetetlen a pontos és egyenletes eredmények eléréséhez, és ebben a cikkben azokat a betekintéseket és technikákat nyújtom, amelyekkel kihasználhatja ezt az erőteljes eszközt. Akár új vagy a rendszerben, akár készségeinek finomítására törekszik, célom, hogy olyan ismeretekkel lássam el Önt, amelyekkel növelheti gyártási kapacitását.
1. lépés: A szerszámfelület előkészítése
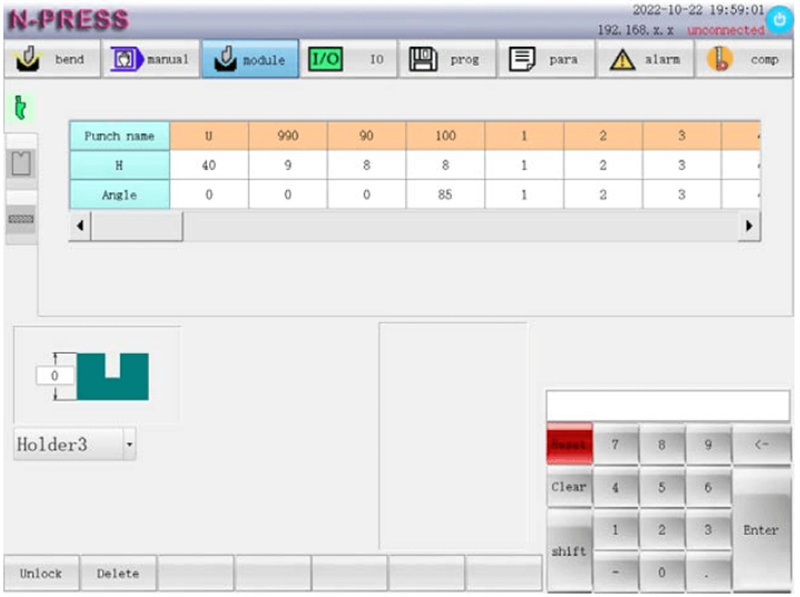
Kattintson a funkcióbillentyűre a szerszám felületének megnyitásához, és állítsa be a felső és alsó szerszám paramétereit, valamint a anyagjellemzőket.
Az ET sorozat szerszámbeállításának megkezdéséhez először gondosan állítsa be az alsó szerszámalapot a jelenlegi program követelményei szerint. A R-emelési magasság pontos beállítása kritikus fontosságú. Amikor a hajlítási méret túl kicsi, és a R-tengely elkerülési funkció engedélyezve van; ha az X tengely hátsó fogaskereke előre van pozicionálva, akkor a R-tengely először erre a magasságra emelkedik, majd a pozicionálás befejezése után leereszkedik, hogy elkerülje a hátsó fogaskerék ütközését a szerszámmal. Győződjön meg róla, hogy ez a beállítás megakadályozza a hátsó mérőszegély és a szerszám közötti érintkezést, ezzel növelve a biztonságot és a hatékonyságot.
2. lépés: A felső szerszám beállításának konfigurálása
Válassza ki és konfigurálja a felső szerszámot a nevének ellenőrzésével, valamint a magasság és a szög beállításával. Ezeknek a paramétereknek a pontossága elengedhetetlen a pontos hajlítási műveletekhez. A megfelelő konfiguráció segíthet elkerülni a potenciális problémákat, például az egyenetlen hajlításokat vagy a szerszámok helytelen igazítását, így biztosítva projektje sikerét.
3. lépés: Az alsó szerszám paramétereinek beállítása
Az alsó szerszám esetében adja meg a szükséges paramétereket, ideértve a szerszám nevét, magasságát (HD), V-szélességét, szögét (β) és a nyomószerszám sugárát (Rd). Állítson be megfelelő biztonsági távolságot az üzemelés során a szerszámmal történő véletlen érintkezés megelőzésére. Ezek a gondosan végzett beállítások biztosítják a biztonságot, és javítják a szerszám teljesítményét.
4. lépés: Az ET sorozatú szerszámbeállításhoz szükséges anyagok konfigurálása
A megfelelő anyag kiválasztása
az ET sorozatú szerszámkészlet beállításánál a megfelelő anyag kiválasztása az első, kritikus lépés. A rendszer lehetővé teszi a felhasználó számára, hogy 10 különböző anyagból válasszon, köztük előre meghatározott lehetőségek – például vas (0), alumínium (1) és rozsdamentes acél (2). Emellett további lehetőségek (3–9) állnak rendelkezésre ügyfél által meghatározott anyagokhoz. Fontos megjegyezni, hogy az alapértelmezett anyagok esetében az egyenletes rugalmassági modulus és a szakítószilárdság értéke állandó, így biztosítva a folyamat konzisztenciáját.
A megfelelő anyag kiválasztásához figyelembe kell venni az egyes anyagok egyedi tulajdonságait a hajlítási folyamatban, például:
Szakítószilárdság (σb): MPa-ban mérve, a szakítószilárdság azt a maximális feszültséget jelöli, amelyet az anyag elvisel, miközben megnyúlik. Ennek az értéknek a megfelelő megadása megakadályozza a folyamatban fellépő hibákat, és javítja a végső termék minőségét.
Rugalmassági modulus (E): MPa-ban mérve, ez az anyag rugalmas deformációjának képességét jelzi. Ügyfél által meghatározott anyagok esetében adja meg a konkrét modulus értékét, hogy a gép megfelelően dolgozza fel az anyagot.
Feszültség- és lehajláskiegyenlítés
A megfelelő feszültség- és lehajláskiegyenlítés alapvető fontosságú a pontos hajlításhoz. Az ET sorozat szerszámbetét-beállításában ez a lehajláskiegyenlítő mechanizmus beállítását jelenti, amely kiegyenlíti a hajlítás során elkerülhetetlen lehajlást. A fő összetevők a következők:
Feszültségérték (V): Határozza meg és adja meg a lehajláskiegyenlítő mechanizmus működtetéséhez szükséges megfelelő feszültségértéket. Ez az érték biztosítja, hogy a mechanizmus elektromos hatás alatt megfelelően működjön.
Kiegyenlítési érték (mm): Adja meg a szükséges kiegyenlítési elmozdulást. Ez kiszámítja a hajlítási műveletek pontosságának és egyenletességének fenntartásához szükséges fizikai beállításokat.
Ezen értékek gondos konfigurálásával az üzemeltetők minden hajlítási feladatnál konzisztens minőséget tudnak biztosítani, ami jelentősen csökkenti a termékhibák előfordulását.
Az ET sorozat szerszámbetét-beállításának részfüggvényeinek hatékony használata
A gépbeállítási folyamat leegyszerűsítéséhez az ET sorozatú formabeállítással elengedhetetlen a formaadatok hatékony kezelése. A részfüggvények használata jelentősen növeli a működési hatékonyságot, és csökkenti a hibák valószínűségét. Például az nem szükséges bejegyzések – például az alsó forma „A1” – törlése biztosítja, hogy a rendszer rendezett maradjon, és könnyen navigálható legyen.
Nem használt formaadatok törlése:
Az ET sorozatú formabeállításban a törlés részfüggvényének használata egyszerű, és lényeges lépés a beállítási folyamat optimalizálása érdekében. Kövesse az alábbi lépéseket a nem kívánt formaadatok törléséhez:
1. Válassza ki a formát: Azonosítsa és válassza ki a formalistából azt az alsó forma nevét („A1”), amelyet törölni kíván.
2. Hajtsa végre a törlés parancsot: Kattintson a „Törlés” feliratú részfüggvény gombra. A rendszer automatikusan törli a kiválasztott oszlop adatait, így segít fenntartani egy rendezett és hatékony forma listát.
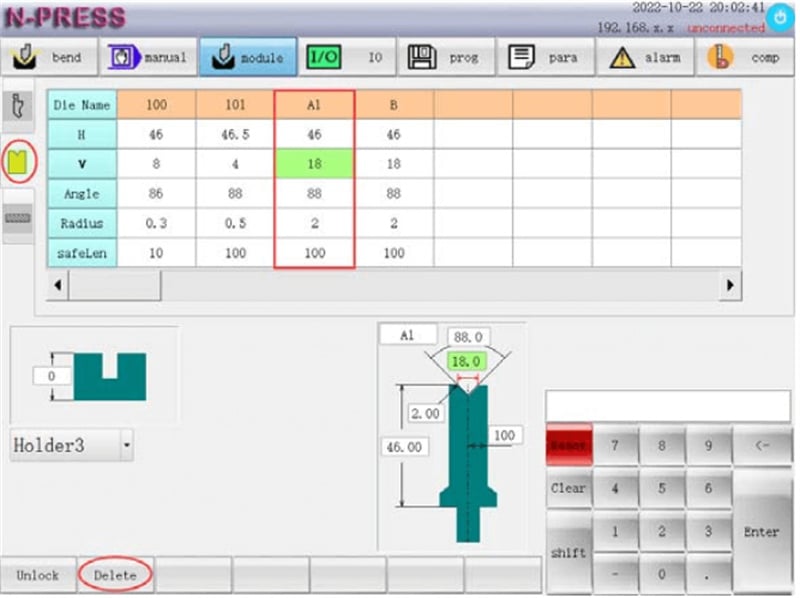
Ez a folyamat a vezérlőpult felületén elérhető ábrán is szemléltetve van, így vizuális útmutatást kap, amikor a sajtolószerszám-adatait kezeli.
Összegzés
Az ET sorozatú sajtolószerszám-beállítás sikeres alkalmazása kulcsfontosságú a teljesen elektromos szervó hajlítógép hatékonyságának és pontosságának maximalizálásához. Összefoglalva, figyeljen a következő fő lépésekre: pontosan kalibrálja a sajtolószerszám-beállításokat, győződjön meg arról, hogy minden alkatrész biztonságosan a helyén van, és ellenőrizze a számjegyvezérléses rendszer integrációját optimális működés érdekében.
Ezen útmutatások követésével jól felkészül arra, hogy növelje berendezéseinek termelékenységét és élettartamát. További segítségért vagy termékeinkről való részletesebb információért kérjük, lépjen kapcsolatba a JUGAO támogató csapatával, vagy tekintse meg honlapunkon elérhető további erőforrásokat.

