


Import souborů DXF z USB flash disku do řídícího systému DELEM: postup provádění
Import souborů DXF do řídicího systému DELEM — snadný jako nikdy dříve! Zjistěte, jak efektivně přenést své soubory DXF z USB klíčenky a vylepšit tak provoz vaší ohýbačky.
Import souborů DXF do řídicího systému DELEM je jednoduchý. Postupujte podle tohoto podrobného návodu k bezproblémovému přenosu vašich návrhových souborů a zajistěte tak přesný chod ohýbačky s minimálním úsilím.
Jste připraveni začít? Projdeme si proces krok za krokem, abychom zajistili hladký přenos souborů a jejich nastavení.
Tento článek vysvětluje, jak importovat soubory DXF z USB flash disku do řídicího systému DELEM. Jako alternativa k přímému kreslení požadovaného výrobku na řídicím panelu může systém také importovat externě vygenerované výstupní soubory CAD. Tento návod popisuje použití konvertoru DXF pro import souborů DXF a vysvětluje jeho funkce.
Příprava:
Vložte USB flash disk
Import kresby formy
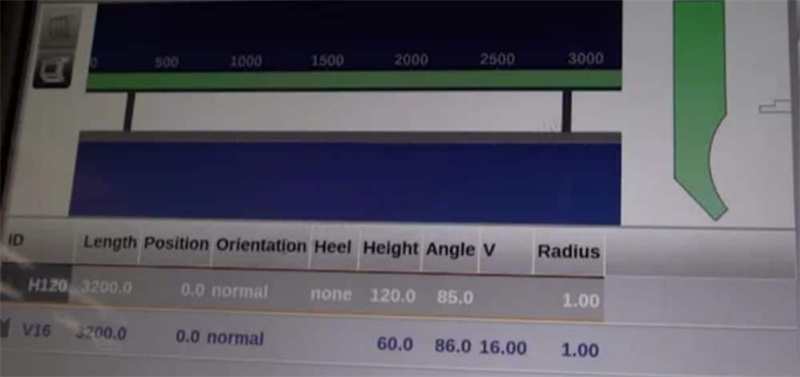
Vyberte správnou klasifikaci v horní části obrazovky; zde jako příklady nastavujeme razítko nebo dolní matrice.
Klepněte na *importovat DXF*, vyberte soubor DXF razítka nebo matic na flash disku, který chcete importovat; klasifikace musí odpovídat.
Klepněte na *vybrat*, kresba se zobrazí na obrazovce.
Klepněte na *převést*, zde můžeme změnit jeho data a ID.
Klepněte na *potvrdit*, kresba se automaticky převede.
Klepněte na *potvrdit*, všechny rozměry se ihned zobrazí přímo na kresbě.
Klikněte na *dokončit*. Úspěšný import výkresů forem. Pokud zákazník má k importu další formy, může tyto kroky opakovat několikrát.
Import výrobních výkresů
Klikněte na *importovat DXF* a vyberte soubor DXF výrobků na flash disku, který má být importován.
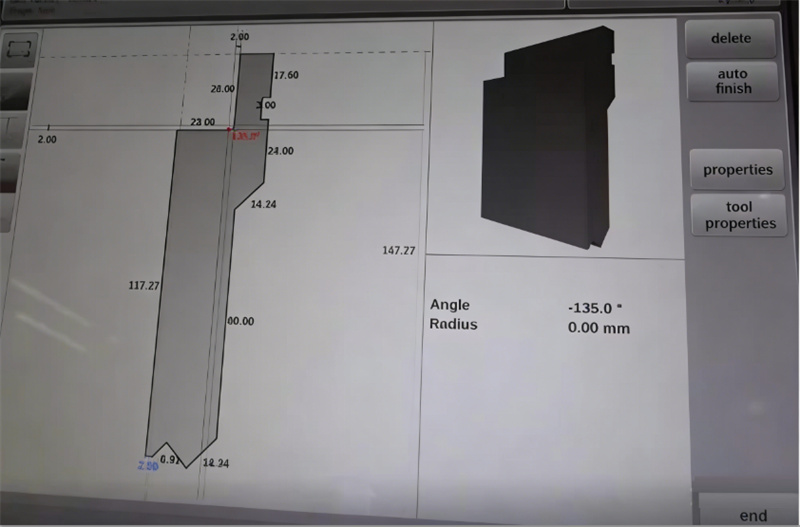
Klepněte na *vybrat*, kresba se zobrazí na obrazovce.
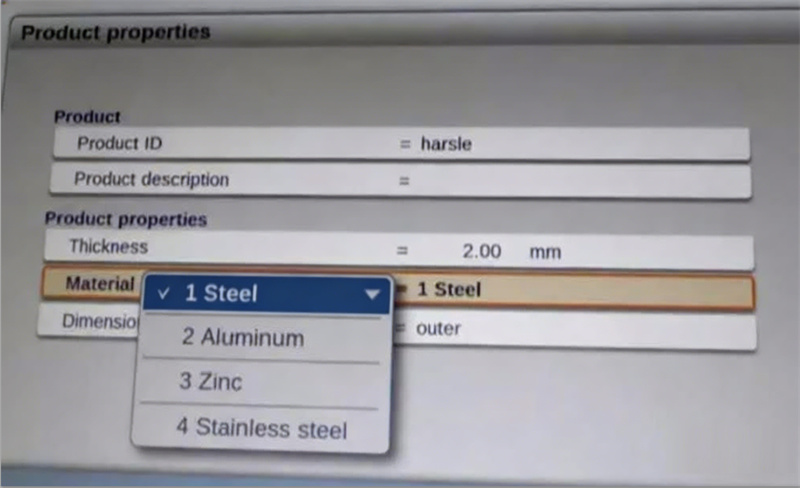
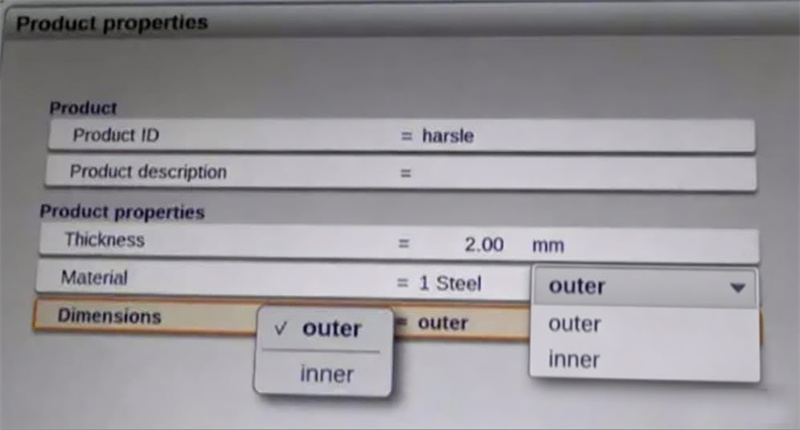
Klikněte na *převést*, objeví se výrobek a jeho vlastnosti. Zákazníci mohou změnit identifikátor výrobku (Product ID) i tloušťku, materiál (1 znamená ocel, 2 znamená hliník, 3 znamená zinek, 4 znamená nerezovou ocel) a rozměry (vnitřní/venkovní pro vybrané).
Klikněte na *potvrdit*, výkres se zobrazí se všemi rozměry.
Klikněte na *nastavení nástrojů*, zákazníci mohou vybrat a potvrdit razníky a matrice použité pro tento výrobek.
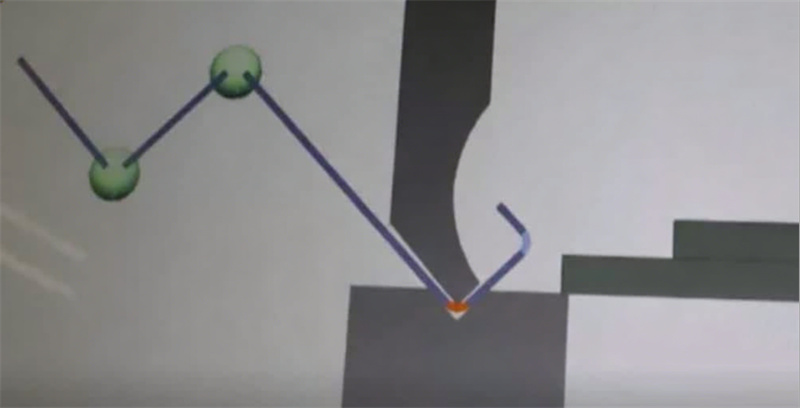
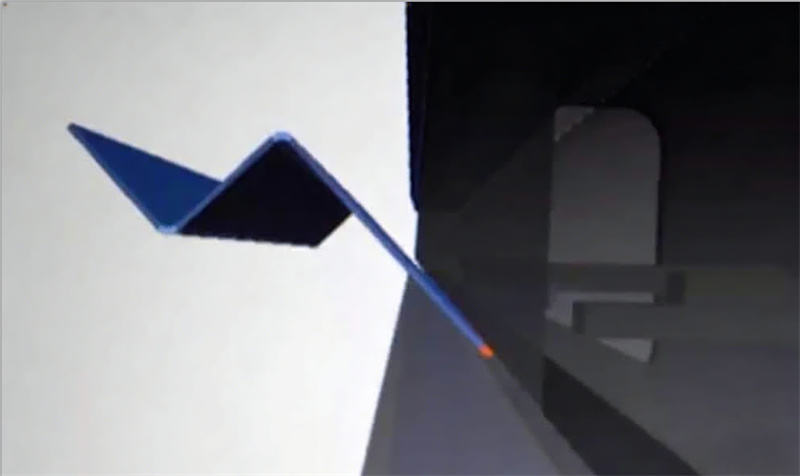
Klikněte na *posloupnost ohýbání*, zákazníci mohou zkontrolovat posloupnost ohýbání a simulované kroky ohýbání. Po potvrzení, že ve 2D simulaci ohýbání není žádný problém, lze potvrdit i 3D simulaci ohýbání výběrem příslušných možností na levé straně.
Klikněte na *Program*, zákazníci mohou obrazovku stáhnout dolů, aby zde zobrazili jednotlivé kroky ohýbání. To je všechno pro tento tutoriál a další informace najdete ve videu níže.

